![]()
![]()
Raspberry Pi x OpenWRT Travel Router
Updates: Wow, this post blew up – thanks to everyone who has been checking it out!
1. I’ve managed to get the oled display to work 🎉 check it out here -> Adding an OLED display to an OpenWrt router.
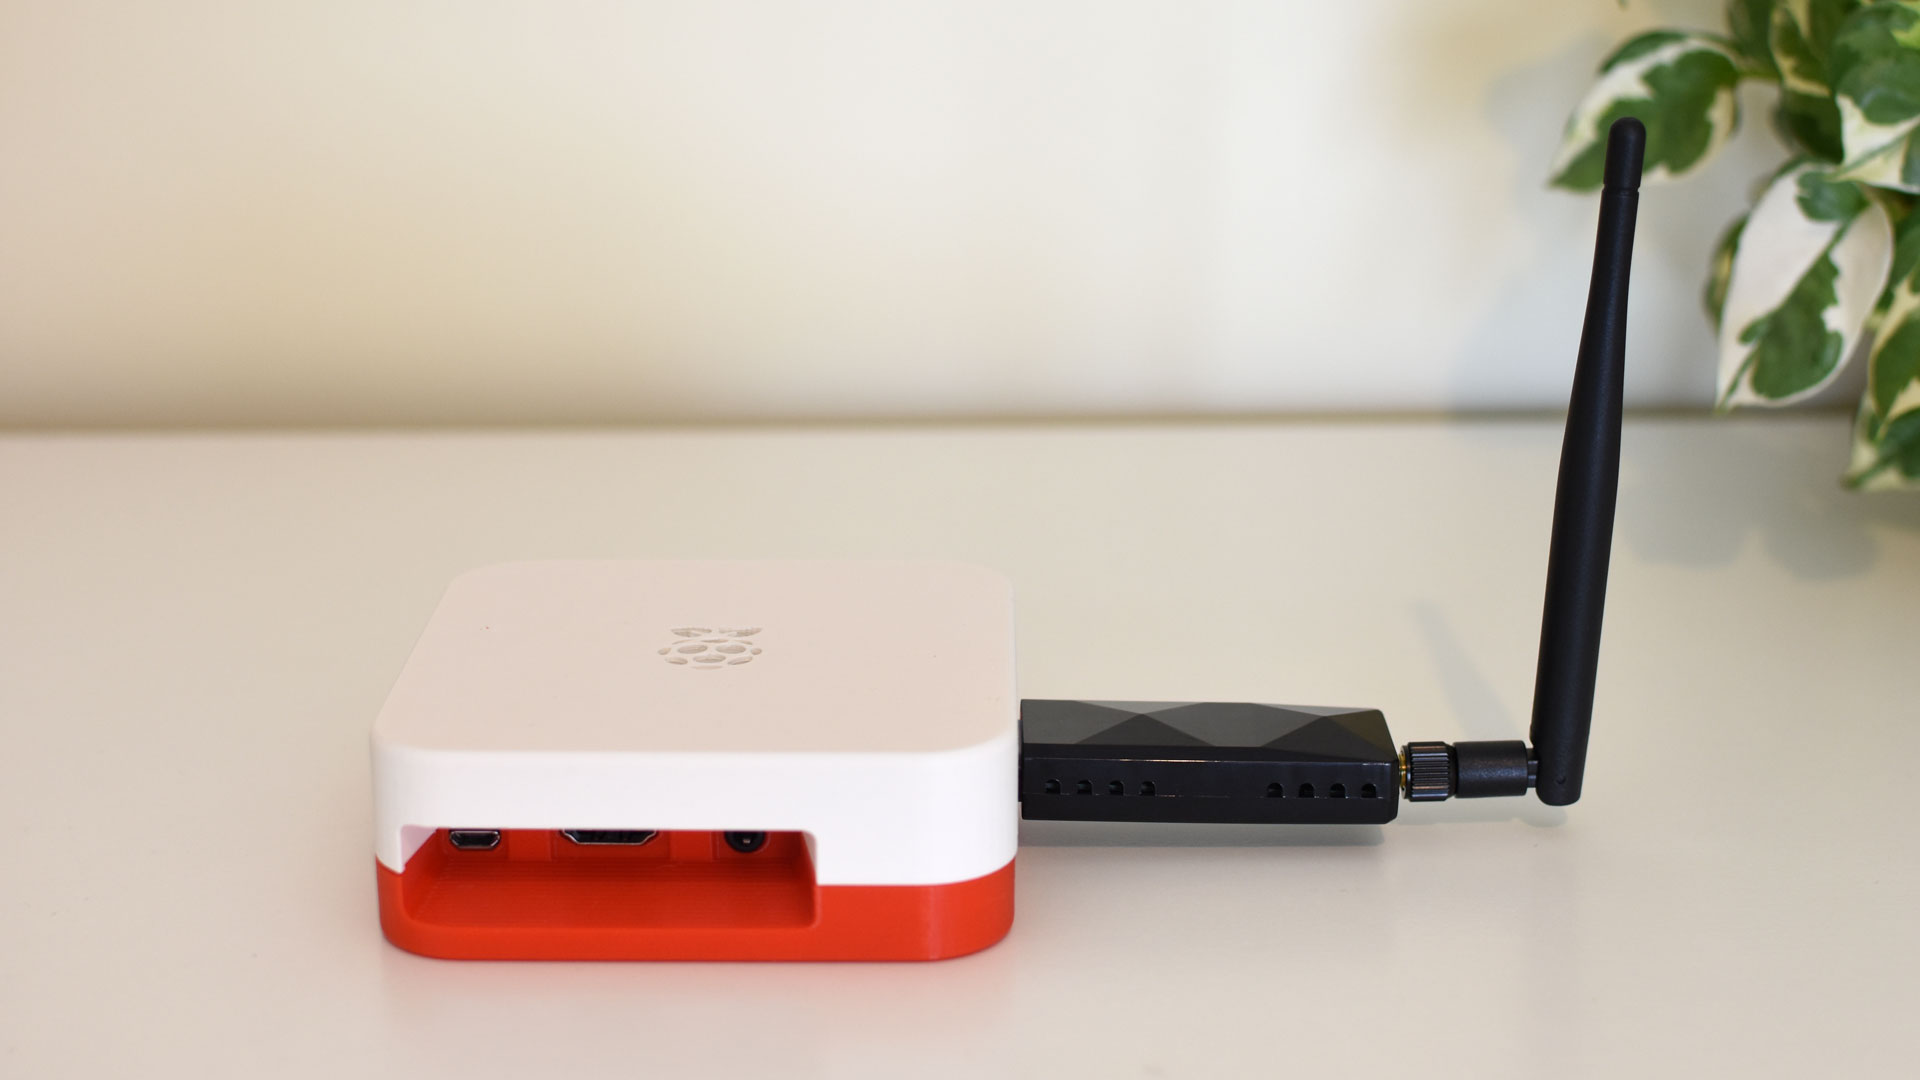
2. I’ve replaced the Atheros AR9271 based USB WiFi card with a Comfast CF-926AC V2. Check out this article for more info on using a Comfast CF-926AC V2 WiFi adapter with OpenWrt.
3. OpenVPN performance was terrible on the Pi so I’ve switched to Wireguard. Check out this article for more info Raspberry Pi OpenWRT router – OpenVPN vs Wireguard client.
This was one of my bigger projects and it was a ton of fun. It’s broken down into the following sections and you don’t have to do everything to have a great travel router:
1. Installing and setting up OpenWRT on your Raspberry Pi
2. Installing AdGuard Home on your Pi so you have network wide advert blocking
3. Routing all traffic through a VPN using OpenVPN
3.1 Performance
4. Adding a physical shutdown button to your Pi
5. Wrapping it all up in a nice 3D printed case

Section 1: Installing and setting up OpenWRT on your Raspberry Pi
Parts list
- A Raspberry Pi 3B+ or 4B
- Sandisk 64gb high endurance SD card (Amazon – US, UK, DE)
- AR9271 based USB WiFi card (Amazon US, UK, DE)
- Alternatively, someone else has confirmed that the Alfa AWUS036ACHM USB WiFi adapter (Amazon US, DE) works with OpenWRT if you use the kmod-mt76x0u drivers.
Download the latest build of OpenWRT from the OpenWRT downloads page.
Use your favourite tool (I used balenaetcher)to write OpenWRT onto your SD card.
OpenWRT only supports a few USB WiFi card chipsets so you don’t have many options here. I picked up a generic AR9271 based USB WiF which works but the throughput isn’t great so I will try a few more in the future.
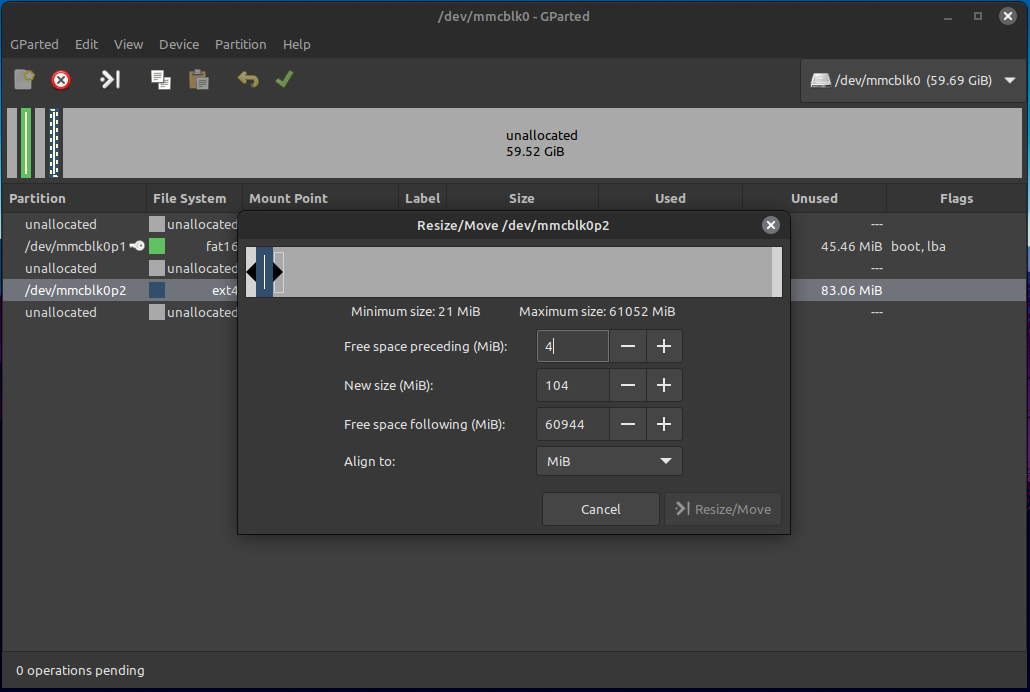
By default, the root partition is +-100mb which is very small so you’ll want to expand this. I tried a few ways and the easiest way is to use GParted on a linux computer.
Insert the SD card into the computer, open GParted.
Right click on the the /dev/mmcblk0p2 partition and select unmount.
Right click on the /dev/mmcblk0p2 partition, select resize and then drag the right hand slider all the way to the end of the disk.
Click Resize/Move and then the green tick icon to apply the changes
Now you can insert the SD card into the Pi and connect the Pi to power and ethernet. I connected the ethernet cable directly to my laptop.
Open your favourite web browser, go to http://192.168.1.1 and login using root as the username and openwrt as the password. Please set a new password in OpenWRT by following the prompts.
From the top menu, click on the Network tab and choose Wireless from the dropdown.
Click Remove next to the existing wireless config and then Save & Apply.

Click Scan to search for available networks, find your network and click Join Selected.
Enter your WiFi password in the WPA passphrase box, click Submit and then Save on the final prompt.

Lastly, click Save & Apply to connect to your WiFi.
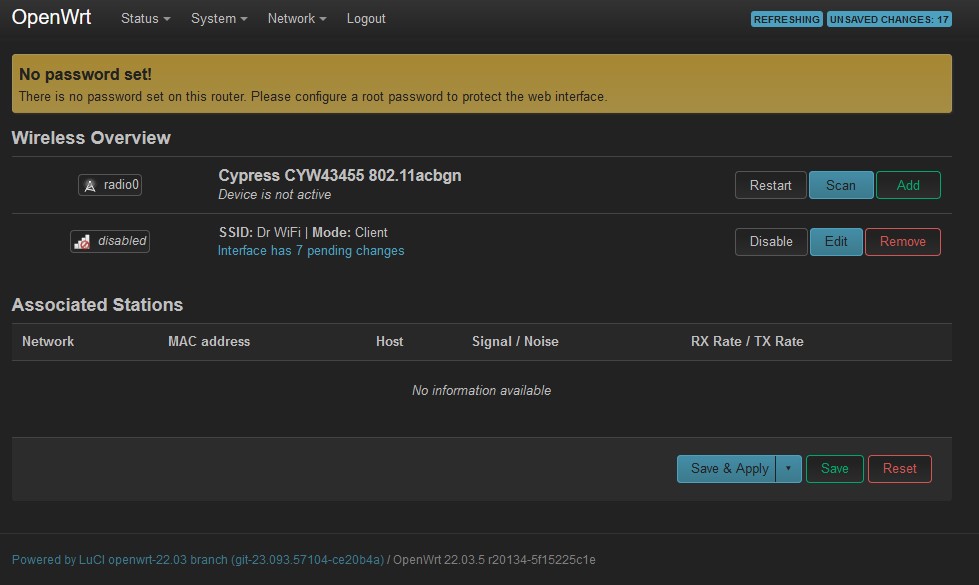
At this point, your Pi should have a WAN connection on the internal WiFi adapter and a LAN connection on the LAN port. 🥳
Now we want to setup the USB WiFi card (radio1) as a WiFi access point for clients to connect to. This might vary slighly depending on the wireless adapter that you have but here is the process for a generic AR9271 based USB WiFi card (Amazon US, DE).
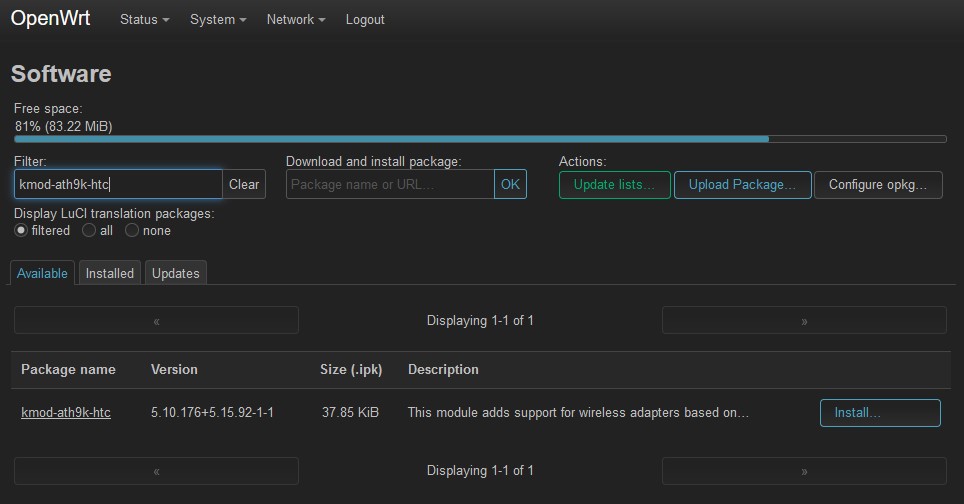
From the top menu, click on the System tab and choose Software from the dropdown.
Click Update Lists and, search for kmod-ath9k-htc, click Install… and then click Install on the popup. This will install the drivers for the Atheros WiFi card.
The final step is to setup the access point for clients to connect to.
From the top menu, click on the Netwoek tab and choose Wireless from the dropdown.
You should now see radio1 and an additional row for an OpenWrt SSID on the Wireless page. Side note: I only got to this point on my 4th USB WiFi adapter because OpenWRT doens’t like TP-Link (Realtek based) wifi adapters.
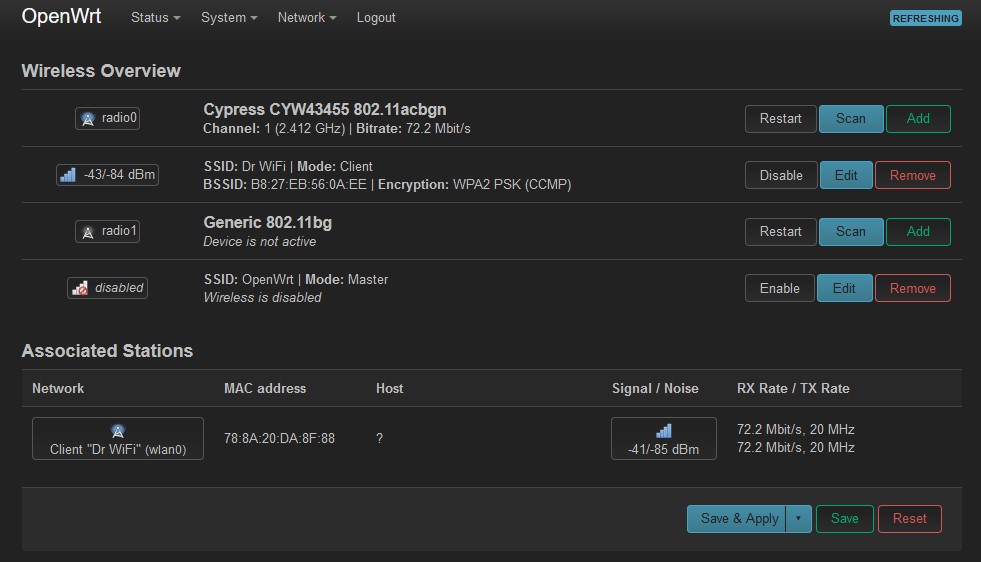
Click Edit for the OpenWrt SSID row and make the following changes:
– Click Enable for Wireless network is disabled
– Change Operating Frequency to 7 (or anything that is free)
– Under Interface Configuration, select the Wireless Security tab, choose WPA2-PSK as the Encryption and enter a password of your choice in the Key field.
– Click Save
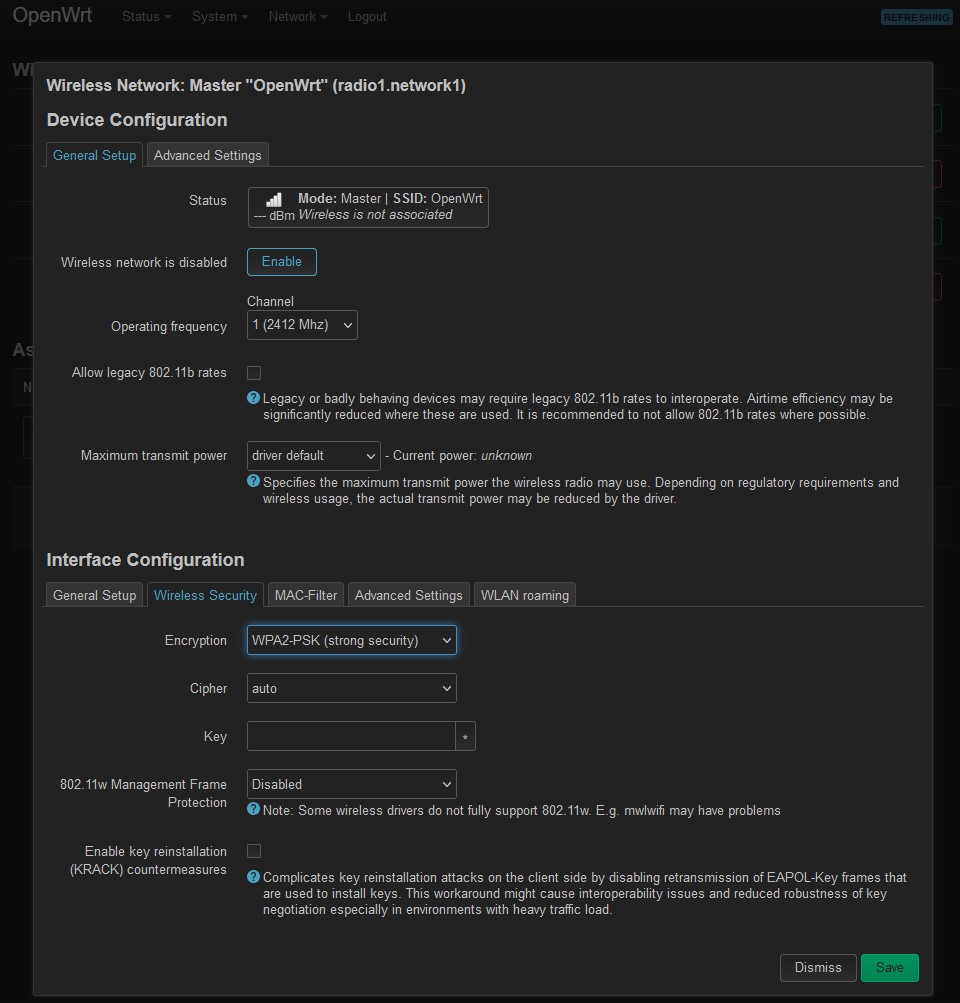
Click Save & Apply and you should now have an access point! 📶
Section 2: Installing AdGuard Home
Follow the AdGuard Home installation guide on the OpenWRT forum to install and configure AdGuard Home on the Pi. It’s really important that you follow their guide exactly (learn from my mistakes!).
Note: That guide uses a setup script. The easiest way to run it is by:
opkg update
#Install nano - a lightweight text editor
opkg install nano
nano script.sh
#Copy and paste the contents of the script into the text editor, save and exit
#make the script executable
chmod +x script.sh
#run the script
./script.sh
Section 3: Routing all traffic through a VPN using the OpenVPN client
Update: As mentioned above, I was struggling with low throughput (OpenVPN seemed to max out around 50Mbps) so I’ve switched to Wireguard which increased throughput to about 200Mbps. Check out this article for more info Raspberry Pi OpenWRT router – OpenVPN vs Wireguard client.
Prerequisite: This guide assumes that you already have an .ovpn config file from your OpenVPN server/provider.
From the top menu, click on the System tab and choose Software from the dropdown.
Click the Update lists button and wait for the process to finish and click Dismiss.
Install the following packages by typing in their name in the Filter field and clicking Install.
– openvpn-openssl
– luci-app-openvpn
Click Save & Apply and refresh the page. You should see a new tab in the top menu called VPN. Click on it and choose OpenVPN from the dropdown.
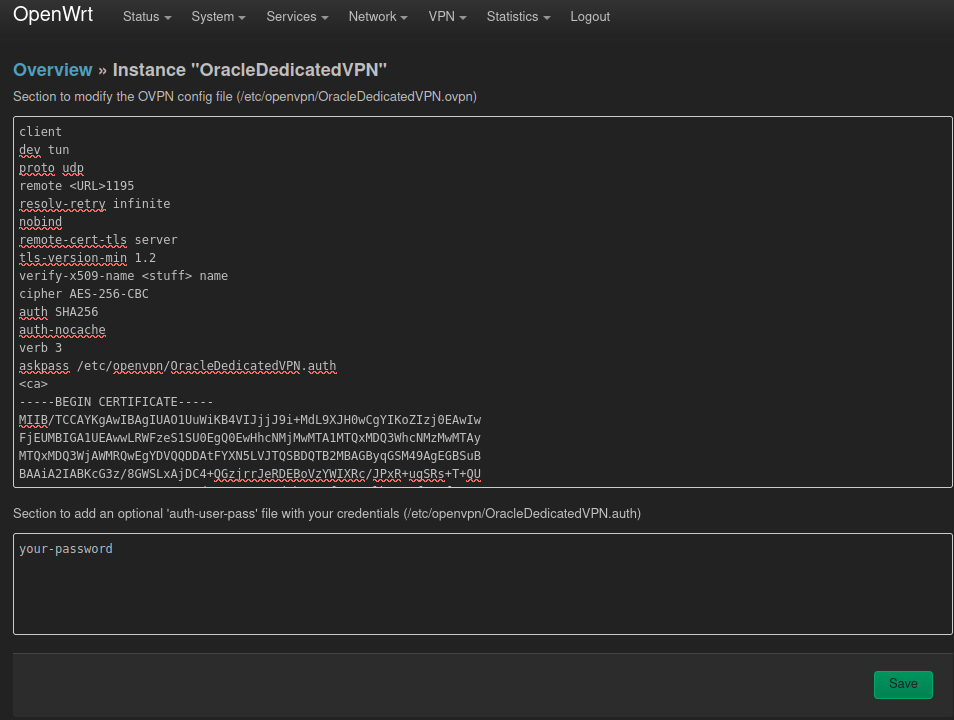
Click on the Browse button next to the OVPN configuration file upload, locate your OpenVPN config file and click Upload.
Your VPN config should appear in the OVPN config file text field. In the lower text field, enter your VPN credentials. Depending on the server you have, this might be a username and password but if you’re connecting to PiVPN, this will likely just be a password.
Now we need to add the following line to the OVPN config file so that it uses the credentials that you have provided. Important: OpenVPN have changed the way things work so do not use auth-user-pass.
askpass /etc/openvpn/<your_vpn_name>.authClick Save.
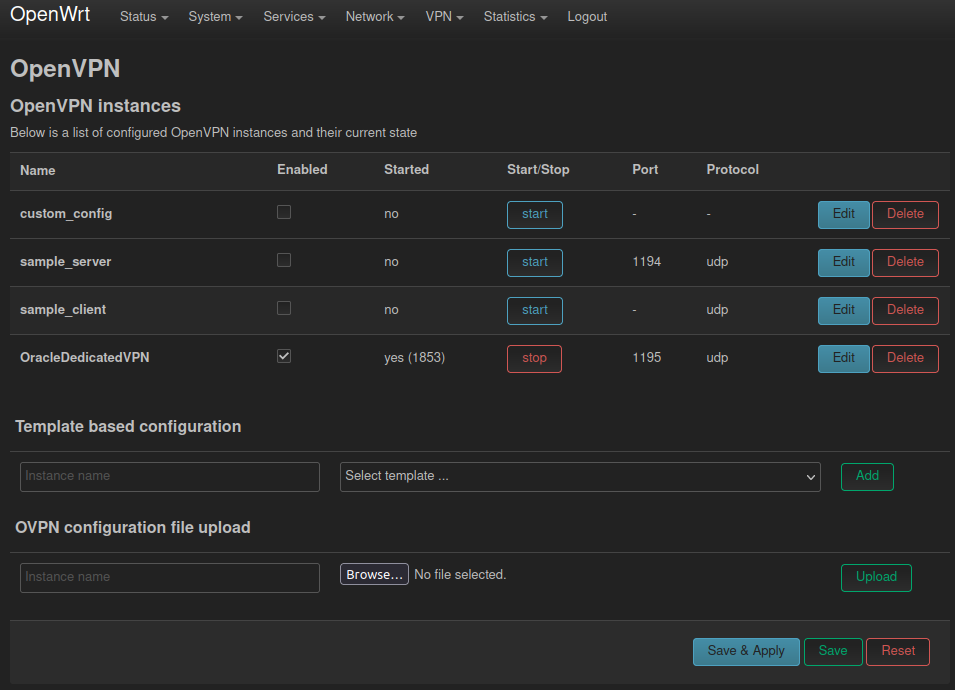
Under OpenVPN instances, check the “Enable” option next to your VPN and then Save & Apply.
Click Start next to your VPN to connect to your VPN server.
Now that your VPN is connected, we need to route traffic through it.
From the top menu, click on the Network tab and choose Interfaces from the dropdown to open the interfaces configuration page.
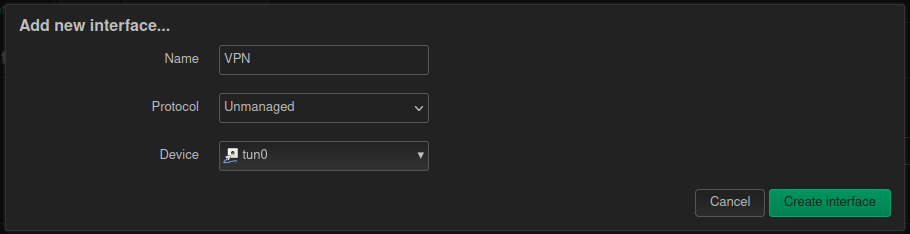
Click on button Add new Interface…
Fill the form with the following values: Name = OpenVPN, Protocol = Unmanaged, Interface = tun0. Then click on Create Interface.
Edit the interface.
Unselect the checkbox Bring up on boot.
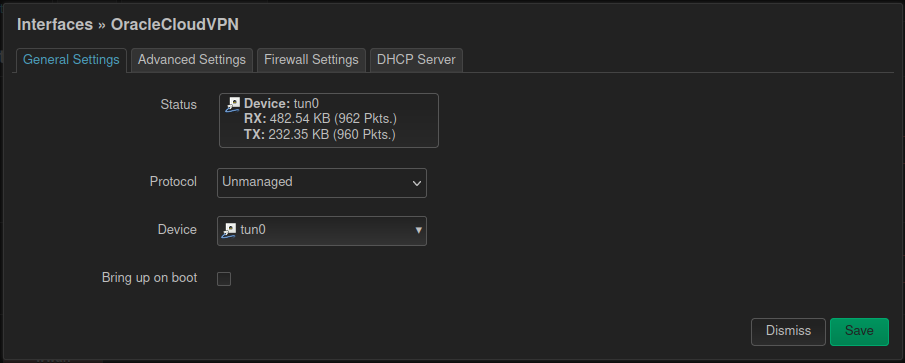
Click on the Firewall Settings tab and select wan from the Assign firewall-zone drop down.

Click Save .
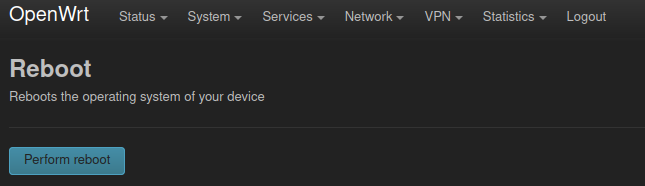
Click on the System tab on the top menu, choose Reboot from the dropdown and then click Perform reboot.
That’s it! All WAN traffic should now go through your VPN.
Section 3.1 Testing the performance
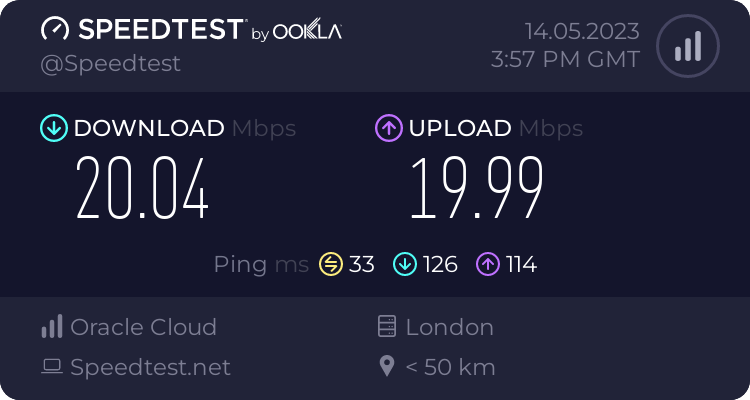
All testing was done using a Pi 3B+ as my OpenWRT router which connected to my Ubiquiti AC LR access point using the Pi’s internal WiFi. All tests were done over a VPN to my Oracle cloud server which can sustain 100Mbps upload and download.
Scenario 1 : Using an ethernet cable to connect the Pi to my laptop.
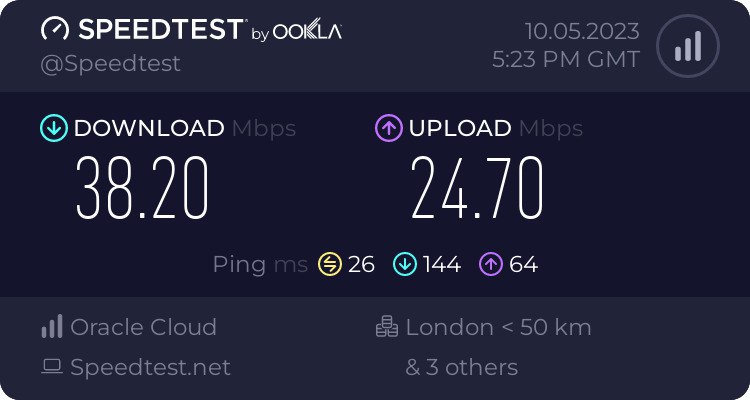
The upload speed test in test 1 was clearly bottle-necked by the 25Mbps upload speed of our internet connection.
Scenario 2: Using the Atheros AR9271 based USB WiFi card connected to the Pi as an access point.
I ran these tests using my trusty old Dell Latitude 7490 which was about 1m away from the access point. They are a mixed bag – the local speedtest (OpenSpeedTest) was pretty promising but the Ookla speeds leave a lot to be desired.

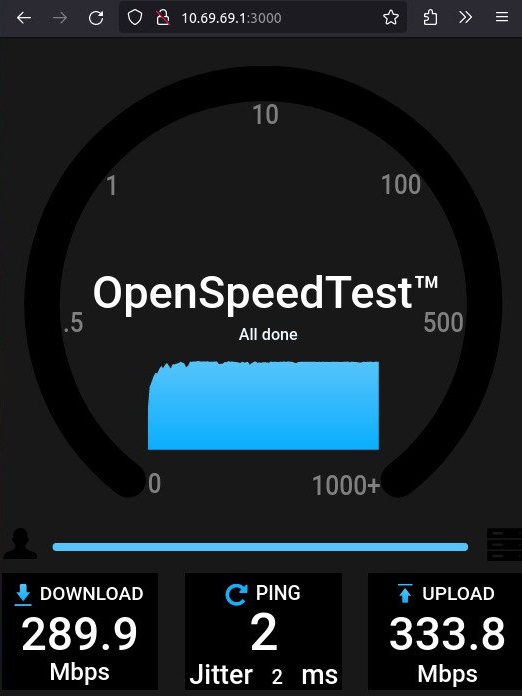
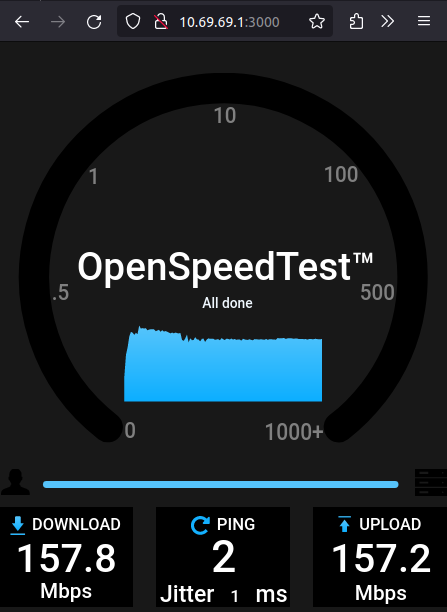
Scenario 3: Using the Comfast CF-926AC V2 USB WiFi card connected to the Pi as an access point.
These tests were conducted under the same conditions as scenario 2 and we saw a big performance improvement. Speedtest.net reported results of 35mbps download which is likely limited by the Pi’s internal WiFi that we’re using as the “WAN” connection and 25mbps upload which is the limit of my broadband connection. I ran tests using OpenSpeedTest which is running in a Docker container on the Pi and we saw speeds of 157mbps up and down which is a massive improvement over the Atheros AR9271 based USB WiFi card. Check out this article for more info on using a Comfast CF-926AC V2 WiFi adapter with OpenWrt.

While all of these tests were running, I kept an eye on the CPU utilization and while connected to the Pi via WiFi, the pi barely broke a sweat. When connected via WiFi, WAN throughput would max out around 20Mbps which used about 12% CPU while the cabled connection to the Pi saw throughput increase to about 35Mbps and 20% CPU. There’s tons of headroom so I’d love to rerun the tests with a more capable USB WiFi adapter.

Section 4: Adding a physical shutdown button
I thought it’d be nice to include a physical button to gracefully shutdown the Pi when you’re done using it. I’ve used the GPIO Zero library instead of the more common RPi.GPIO library because RPi.GPIO refuses to install on OpenWRT.
On your computer,open terminal/cmd prompt/your favourite SSH client, type in the following command to connect to yout Pi ssh [email protected] (or whatever IP you’ve given your Pi) and hit enter.
Now we need to install Python and the gpiozero library so run each of these commands separately.
opkg update
opkg install python3 python3-pip
pip3 install gpiozero
Fetch the shutdown_only_controller.py script from my GitHub. This will place it in the /root/ directory.
Next we’ll need to add the following line to your rc.local to run the script on startup.
#If you don't have nano installed, run this to install it
opkg install nano
#now edit rc.local using the nano text editor
nano /etc/rc.local
#add the following line to your rc.local file above exit 0
python /root/shutdown_only_controller.py &
This is what your rc.local should look like.

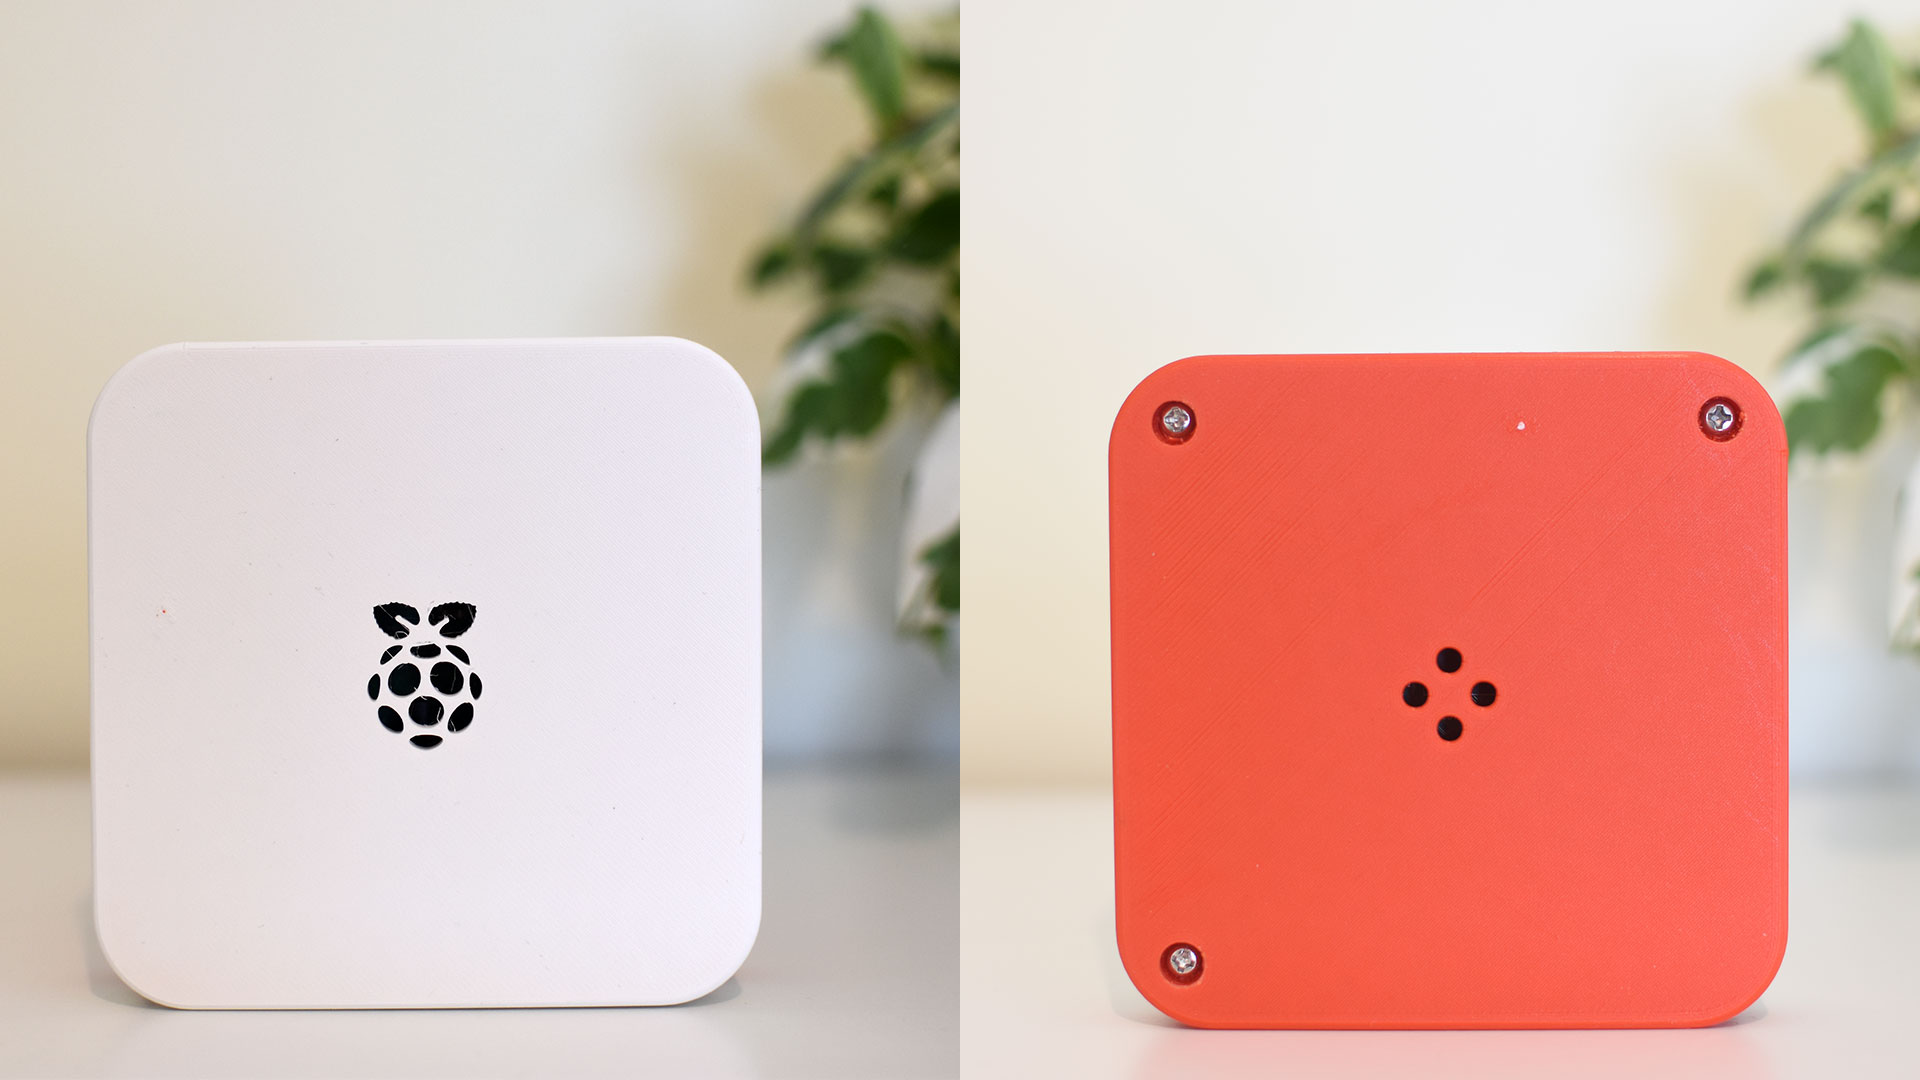
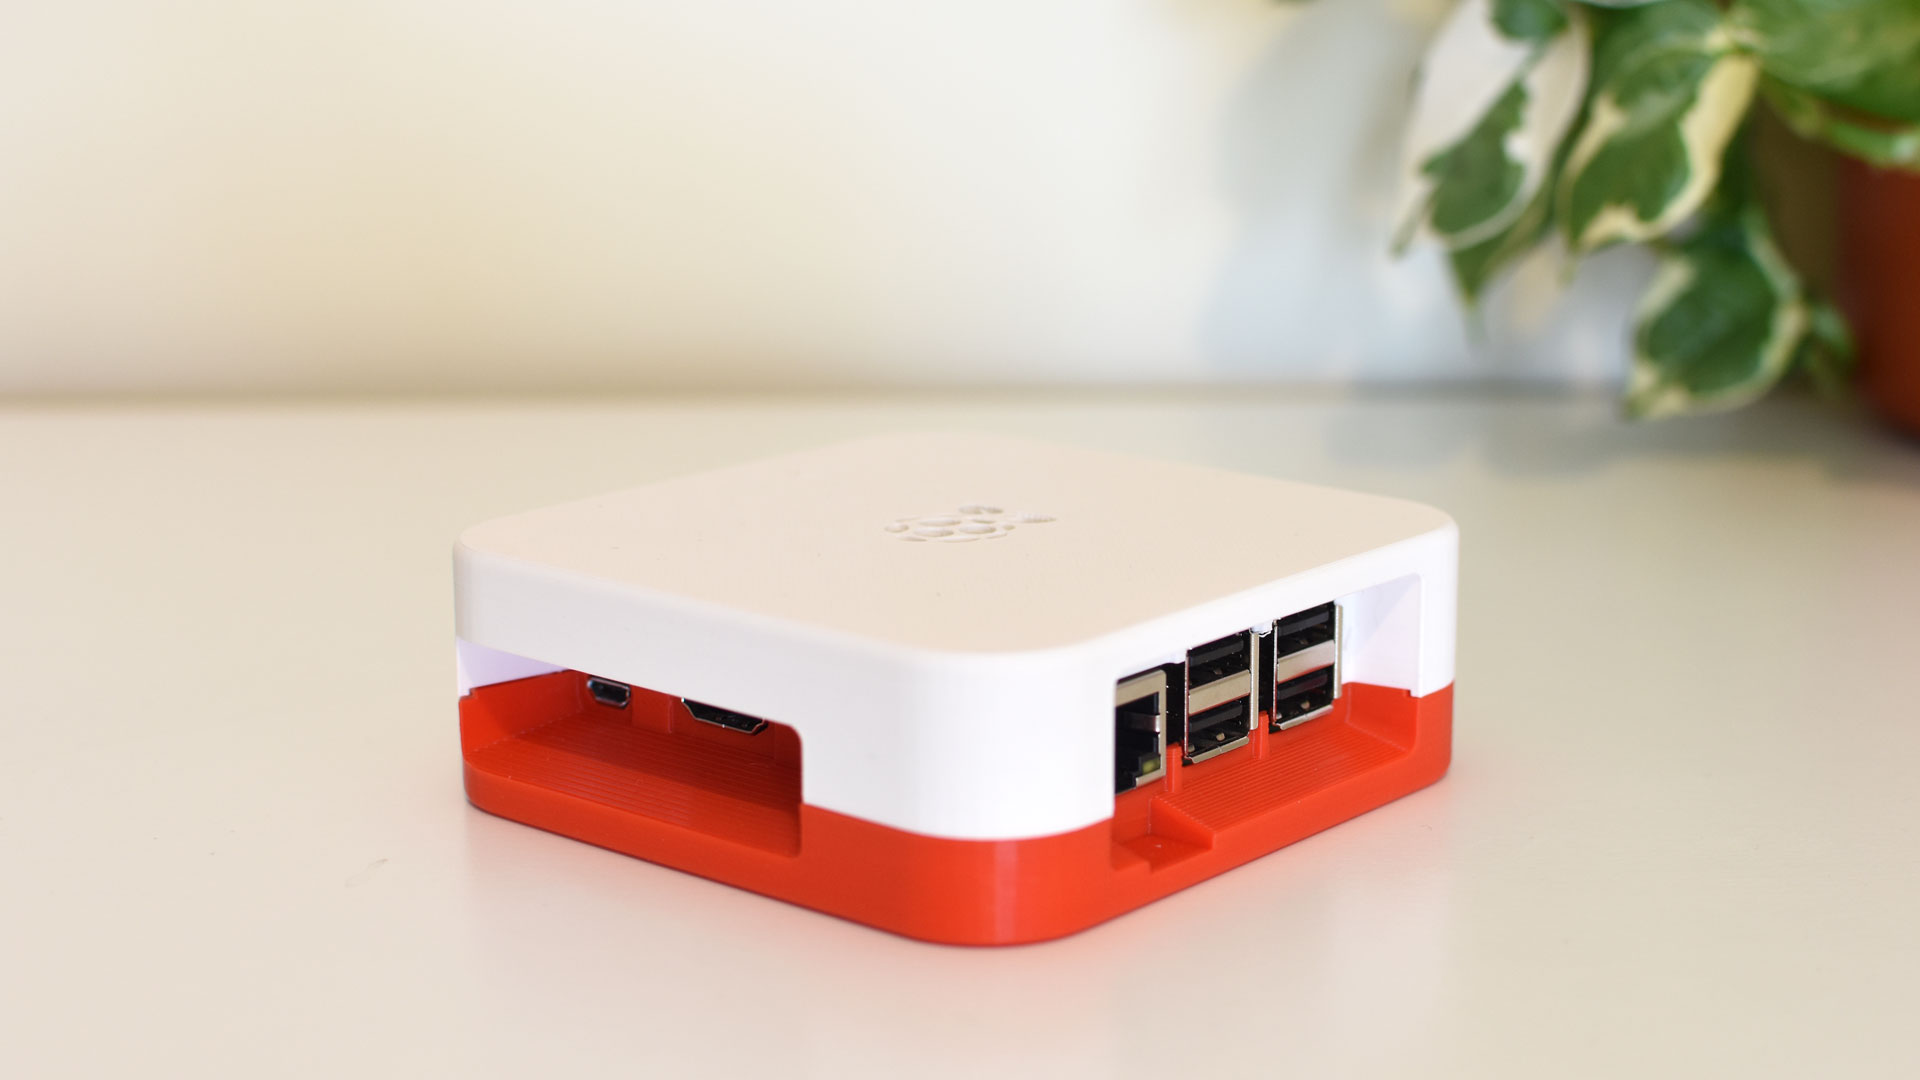
Section 5: Wrapping it up in a 3D printed case
Inspired by this Rapberry Pi 2 case on Thingiverse, I thought I would remix it to have space for the power button, slightly better passive cooling and most importantly, a Raspberry Pi logo on the top lid. Each half of this print took about 5 hours on my Creality Ender 3 v2 Neo.
The Pi is held down with 4 x M2.5 screws and brass inserts and the lid is held on with 4 x M3 screws and brass inserts.
You can find the .stl’s on Printables here.
Parts list:
- SPDT Momentary Push Button (Amazon – US, DE)
- eSUN PLA – red for the bottom of the case (Amazon – US, DE)
- eSUN PLA – matte white for the top of the case (Amazon – US, DE)
- Tristam’s toolbox essentials

*The product links in this post may contain affiliate links. Any commission earned is used to keep the servers running and the gin cool.
Thanks for making it to the end of the post!


I’ve done something similar using any Linux distribution, which opens your USB wifi options up, or just use onboard wifi.
Instead of running openwrt os, you could run it in a vm. Then bridge the vm interface with a Linux host bridge. With that you can use hostapd to create a wifi access point using that bridge for wifi. I get 80-90 Mbps down with a pi4.
@Graham Steffaniak
Can you perhaps provide some additional instructions for this process and the use of the VM to get the increased throughput?? Thanks for sharing
Why not just use tailscale instead of openvpn?
Tailscale is a great option but most VPN providers (Nord, PIA, etc) don’t offer Tailscale yet.
I image to go to a hotel, plug in the travel router via cable into lan port or connecting it to the hotels WiFi with the Pi’s internal WiFi module.
How can you deal with login pages or other intro pages that want you to accept terms and conditions that often come with public networks?
There are a few ways to achieve this. Have a look at the solution outlined here – https://forum.openwrt.org/t/wifi-captive-portal-detection-program/31822
Wow! Looks awesome. I don’t have a 3D printer, but wishing I could get one. ?? Would or could you add a laptop fan to it? Just wondering!
Good idea! I noticed the Pi’s CPU getting a bit warm (>65’c) so I’ve updated the design of the lid to have more ventilation and allow for a 25mm fan to be installed. Keep an eye out for an upcoming post 🙂
Would this would with RPi 2B?
Hey Brian, it should work! Two things to keep in mind:
1. The 2B only supports 32bit/armhf operating systems
2. There’s no built in WiFi and the LAN port is limited to 100mbps
Sorry for the obvious question as this is my first Raspberry Pi project, are there any more detailed descriptions on the sizes of the heat-shrink tubing, cable and PCB headers?
you did a great job with this tutorial!!!
But i have been having an issue, everything has been going smoothly until the part where the tun0 interface won’t show uo no matter what, i’m using a raspberry pi 3b+, and i don’t have a wifi adapter compatible with wrt so i just skip its configuration part and leave my pi connected to my pc with the ethernet cable, also i have been using .ovpn config files from sites like vpngate and freeopenvpn if this could be the reason why but those config files have been getting my vpn to start after i check the enable box without any problems.
got any idea what could i be missing? thanks in advance!