![]()
![]()
Raspberry Pi OpenWRT router – OpenVPN vs Wireguard client
As part of my Raspberry Pi based travel router project, I setup a VPN client on the Pi using OpenVPN because that’s what I’m familiar with. Unfortunately the performance was pretty poor so I decided to move to Wireguard in an attempt to improve throughput. A guide to setup the Wireguard client in OpenWRT is at the bottom of this article.
Setup – For this demo, I’m using a free ARM based virtual server from Oracle that runs PiHole for DNS ad blocking and PiVPN as a Wireguard and OpenVPN server. I did a few speedtests on the server and seem to get about 1gbps upload and 2gbps download so that won’t be a bottleneck… for now 🙂
I connected the Raspberry Pi’s ethernet port (which has been configured as a WAN port in OpenWRT) to my network switch so the Pi has a 1gbps uplink and use a Comfast CF-926AC V2 WiFi card as the access point for my laptop to connect to.

Important note: My home internet connection is 250mbps download and 25mbps upload and all of the test conducted easily saturated the 25mbps upload so we can ignore those.
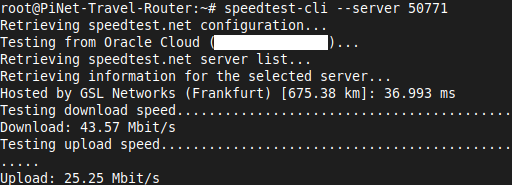
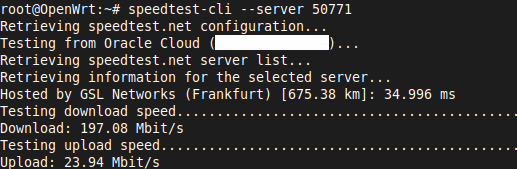
To get a benchmark, I started off by using the python3-speedtest-cli to run a speedtest on the Raspberry Pi router to remove the WiFi connection as a variable. Wireguard achieved 197Mbps download while OpenVPN only managed 43Mbps so it’s a big win for Wireguard.
Next up was running an Ookla speedtest from my laptop that is connected to the Raspberry Pi via WiFi. It looks like the WiFi connection is starting to be an issue here because Wireguard only managed 123Mbps while OpenVPN did slightly better than previously at 59Mbps. I suspect this test used multiple concurrent connections which could explain the better results from OpenVPN.


Now this is where things get interesting. While downloading an Ubuntu .iso, I noticed that OpenVPN was using about 30% of each CPU core on the Pi to get a throughput of 2.3MB/s (about 18Mbps) while Wireguard used about 50% to get a throughput of 9.8Mb/s (about 80Mbps – close to the WiFi limit).


Just as we thought things were going well, the dreaded throttled=0x500005 makes an appearance. While downloading the Ubuntu .iso, I noticed that the download speed was fluctuating. After doing a bit of digging, it looks like the increased CPU usage resulted in the Pi pulling 1.2A which was too much for the Pi power supply to provide at 5v so the voltage dropped to 4.9v so the Pi throttled the CPU frequency back to 600Mhz.


How to route all OpenWRT traffic through a Wireguard VPN
Prerequisite: This guide assumes that you already have an .conf config file from your Wireguard server/provider.
From the top menu, click on the System tab and choose Software from the dropdown.
Click the Update lists button and wait for the process to finish and click Dismiss.
Install the following packages by typing in their name in the Filter field and clicking Install.
– kmod-wireguard
– luci-proto-wireguard
– luci-app-wireguard (note: Try installing this first, it should automatically install the others)
Click Network > Interfaces > Add new interface. Enter wg0 as the interface name, select WireGuard VPN from the Protocol drop down and click Create interface.
Enter the following parameters from your Wireguard .conf file on the General Settings tab:
- Bring up on boot – checked
- Private key – from your .conf file
- Public key – from your .conf file
- Listen Port – leave blank
- IP Addresses – from your .conf file
Click on the Firewall tab and select the WAN zone for Create / Assign firewall-zone.
Click on the Peers tab > Add peer and enter the following parameters:
- Description – anything
- Public Key – from your .conf file
- Private key – from your .conf file
- Preshared key – from your .conf file (if you have one)
- Allowed IPs – add 0.0.0.0/0 and ::/0 (each on its own line)
- Route Allowed IPs – checked
- Endpoint Host – the server URL/IP from .conf file
- Endpoint Port – the server port from .conf file
- Persistent Keep Alive – 25 (seconds)
Click Save and then Save & Apply on the Interfaces tab.
To avoid DNS leaks, click Network > Interfaces > WAN (edit) > in ‘Use custom DNS servers’ add at least one public DNS resolver such as 1.1.1.1, 9.9.9.9
Save & Apply and reboot the router. After reboot, you can check the status of the WireGuard connection in Status > WireGuard
*The product links in this post may contain affiliate links. I donate 20% of these earnings to the Good Work Foundation to help innovate learning in South Africa’s rural communities.
Thanks for making it to the end of the post!