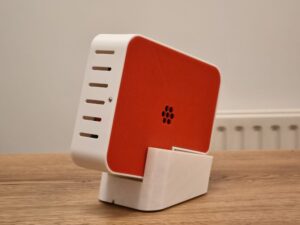
Raspberry Pi 5 OpenWRT Travel Router

After a couple years of use from my old Raspberry Pi x OpenWRT Travel Router, it was time to upgrade. The brief was pretty simple – it has to be smaller, faster, based on a Raspberry Pi and most importantly, simpler so there will be no oled display or soldering required to build this one.
To get started, you’ll need the following parts:
- Raspberry Pi 5 (Amazon – US, UK, DE)
- Raspberry Pi 5 active cooler (Amazon – US, UK, DE)
- USB U shape adapter (Amazon – US, UK, DE)
- Sandisk 64gb high endurance SD card (Amazon – US, UK, DE)
- Comfast CF-926AC V2 WiFi adapter (Aliexpress – note this is the newer version so the wifi lid may not fit. I have ordered one and will update the .stl accordingly)
- Alternatively, someone else has confirmed that the Alfa AWUS036ACHM USB WiFi adapter (Amazon US, UK, DE) works with OpenWRT if you use the kmod-mt76x0u drivers.
- M2.5 screws and brass threaded inserts – links on my toolbox page

Printing the case – While you’re waiting for the parts to arrive, you can start printing the case which is available on my printables page. I printed it in black PLA with red PLA for the power button. Please take a moment to share your print so everyone can see what it looks like in different colours.
Flashing OpenWRT – Head over to the OpenWRT website to download the latest build for the Pi 5 (it’ll be under /bcm27xx/bcm2712/) and flash it to your micro SD card using Etcher or Rufus.
Tweaking your installation for the Pi 5 – while your SD card is plugged in to your computer, it’s time to add a few lines to the config.txt file in the BOOT partition. The first line here is used to enable the Pi 5’s built in power button while the last two lines are used to turn on the Pi 5’s active cooler when the CPU temp goes above 50’c. Once you’ve saved this, you can eject the sd card and boot the Pi.
C
dtoverlay=gpio-shutdown,gpio_pin=20,active_low=1,gpio_pull=up

dtparam=fan_temp0=50000,fan_temp0_hyst=5000,fan_temp0_speed=125
dtparam=fan_temp2=65000,fan_temp1_hyst=5000,fan_temp2_speed=255OpenWRT first boot – You’re almost there! In order for the Pi 5’s onboard power button to work, you’ll need to connect the Pi to internet (likely via WiFi) so that you can install the needed software package. Once you’re connected to internet, navigate to System -> Software, update the packages, search for the kmod-button-hotplug package, install it and reboot the device.
If you are using a Comfast CF-926AC wifi card, here is my guide for getting that to work with OpenWRT.
From here, there is no end to the amount of customisation that you can do. I’d recommend checking out my guide on how to setup Wireguard so that all of the traffic is routed via a secure VPN tunnel.
Lastly, a few pics of the build – good luck building yours!


*The product links in this post may contain affiliate links. I donate 20% of these earnings to the Good Work Foundation to help innovate learning in South Africa’s rural communities.
Thanks for making it to the end of the post!