![]()
![]()
Privacy friendly ESP32 smart doorbell with Home Assistant local integration
Privacy focused “smart” doorbells seem to be few and far between so I decided to build one that integrates with Home Assistant via ESPHome and is easy to build.
This project is aimed at being simple while allowing a ton of customisation and flexibility. To get started, you’ll need an instance of Home Assistant running with the ESPHome add-on as well as the Home Assistant companion app on your mobile phone to receive notifications when someone presses the doorbell button.
I have used an 8 RGB LED ring light in my version but if you want to simplify things, you can skip this and use the ESP32-CAM’s built in LED as a flash – it’s surprisingly bright.
Update: I’ve received a lot of questions about the need for the pull-down resistor on GPIO-14 (the pin for the button). According to this github post, the ai-thinker version of the ESP32-CAM doesn’t have all of the usual ESP32 pull-up or pull-down resistors. I tried using the INPUT_PULLDOWN feature in esphone for GPIO14 but it didn’t work. Given the number of ESP32-CAM variants coming out of China, your mileage might vary on this one.
Parts list:
- ESP32-CAM (Amazon – US, UK, DE) Make sure to get one with a “flash/download/io0” button to make your life easier when you flash ESPHome onto it for the first time. If you make the same mistake as me and buy the one without that button, follow this guide to flash the ESP32-CAM using an FTDI adapter.
- Momentary push button (Amazon – US, UK, DE)
- 8 RGB LED ring light (Amazon – US, DE) Note: these aren’t the exact ones that I used but they are the closest ones that I could find. I used the Pi Supply PIS-1270 from RS Components.
- 10m Micro USB cable (Amazon – US, UK, DE)
- Tristam’s toolbox essentials
You can find the .stl’s on Printables here and the home assistant config in my github repo: thatguy-za/esp32-cam-doorbell.
Build guide
Step 1 – Printing the enclosure
This step takes the longest so lets send the .stl’s to the printer while we crack on with the rest of the build. There are three pieces that you’ll need to print:
1. The main body
2. The ESP32-CAM retention plate
3. The back plate/wall mount
You’ll need to print the front and the back of the enclosure with supports. I printed it using PLA but you’ll want to use PETG or ABS filament so it is waterproof and use 20-30% infill.
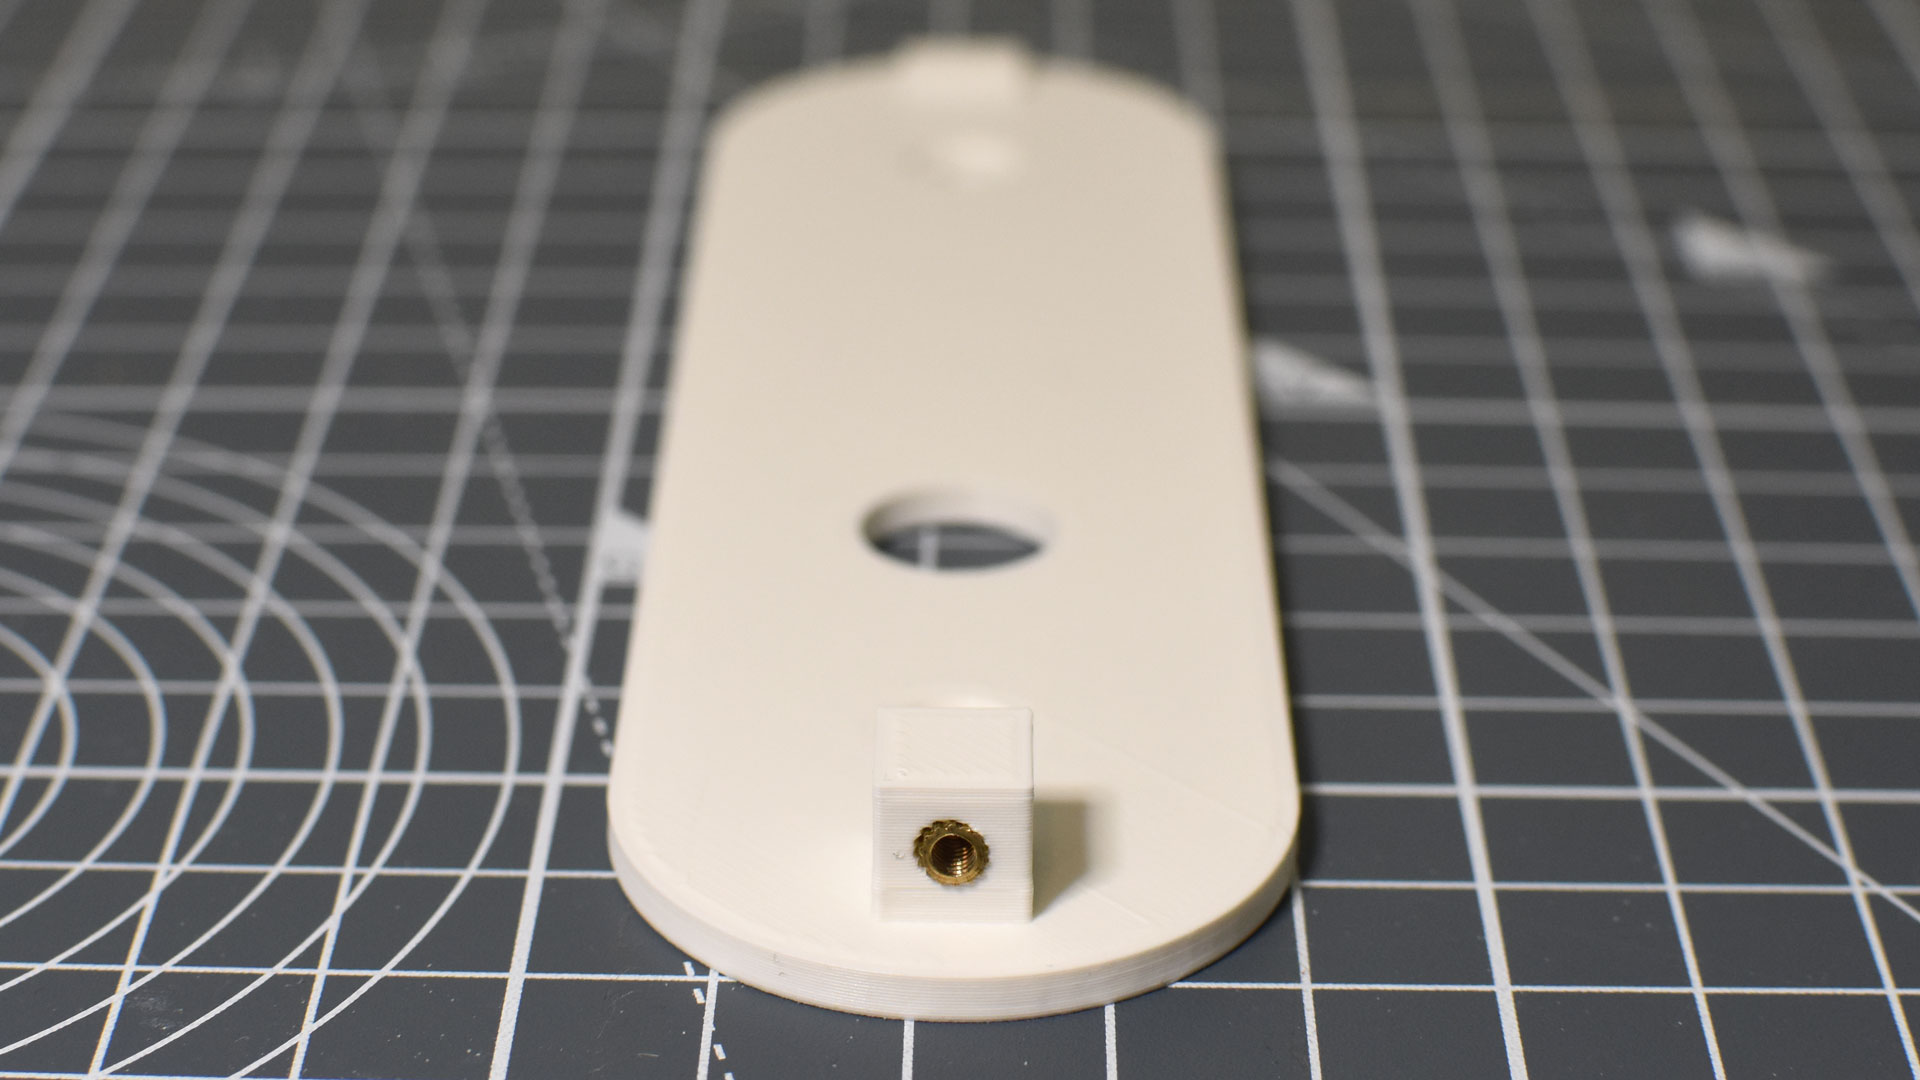
Once everything has printed, you’ll need to add two M2.5 threaded inserts:
1. Into the front cover so you can screw the ESP32-CAM retention bracket into it.
1. Into the bottom of the backplate so you can screw on the face plate with a 10mm M2.5 screw
Step 2 – Configuring the ESP32-CAM in ESPHome
Hold down the “flash/download/io0” button and connect your ESP32-CAM to your computer using a micro USB cable. This will boot it into flashing mode.
Launch Google Chrome, go to your instance of Home Assistant and launch the ESPHome Add-on by clicking Settings -> Add-ons -> ESPHome -> Open Web UI. Chrome is important because it seems to be the most reliable browser for flashing firmware onto the ESP32-CAM.
Click + New Device to add a new device.Give it a name (“Doorbell” is probably a good starting point).
When asked to select the device type, select ESP32 and check the box “use recommended settings’.
Once the configuration has been created, you can skip installing it onto the device – we’ll do that later.
From your list of ESPHome devices, click Edit on the device that you have just created.
At the bottom of the yaml file (below captive_portal:), paste the configuration code from my github repository that is linked above.
Click Save and Install.
Select Plug into this computer.
Click Open ESPHome Web, this will allow you to flash the firmware onto the device from the web browser. This is where it is important that you are using Google Chrome.
Once the firmware has compiled, you should be able to click Download Project – this could take a few minutes.
Head over to ESPHome Web and follow the prompts to flash the firmware onto your ESP32-CAM.
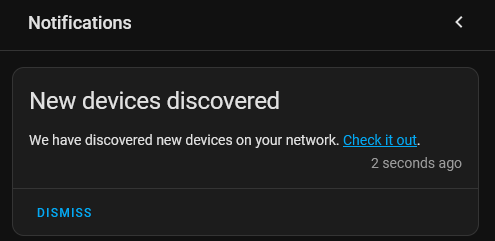
Home Assistant should discover the new device once the new firmware has been flashed onto it – yay! Now you can add whatever entities you want to your dashboard.
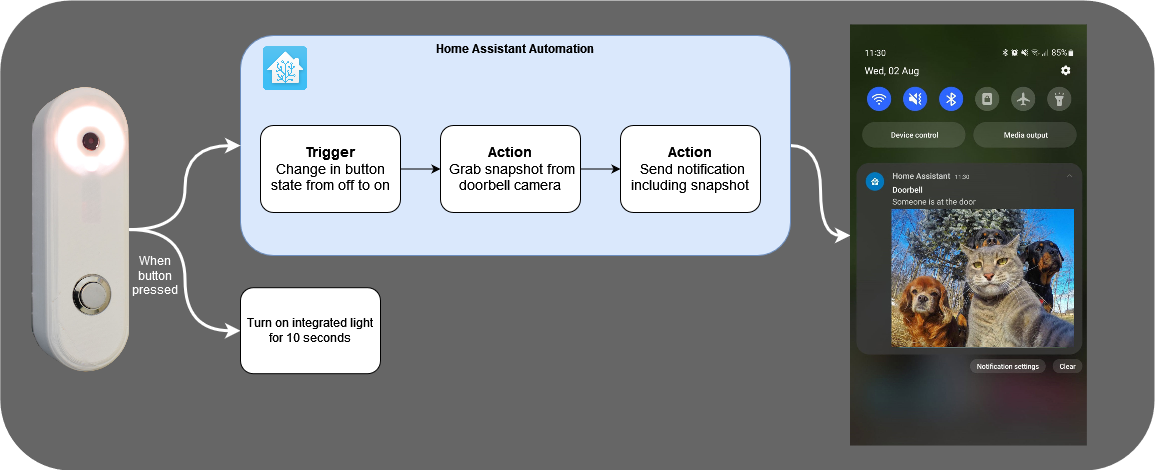
Step 3 – Time for some automation & notifications
We want to create an Automation to take a snapshot from the doorbell’s camera and send it to your mobile phone when someone presses the doorbell button.
Click Settings -> Automations -> + Create Automation and then create a new automation from scratch.
Click on the three vertical dots in the top right hand corner of the screen and then click Edit in YAML
Paste the automation from my github repo (linked above) into the editor and update entity names for devices such as your mobile phone.
Save the automation and restart Home Assistant so the new automation becomes active.
Here is a summary of how the automation should behave.
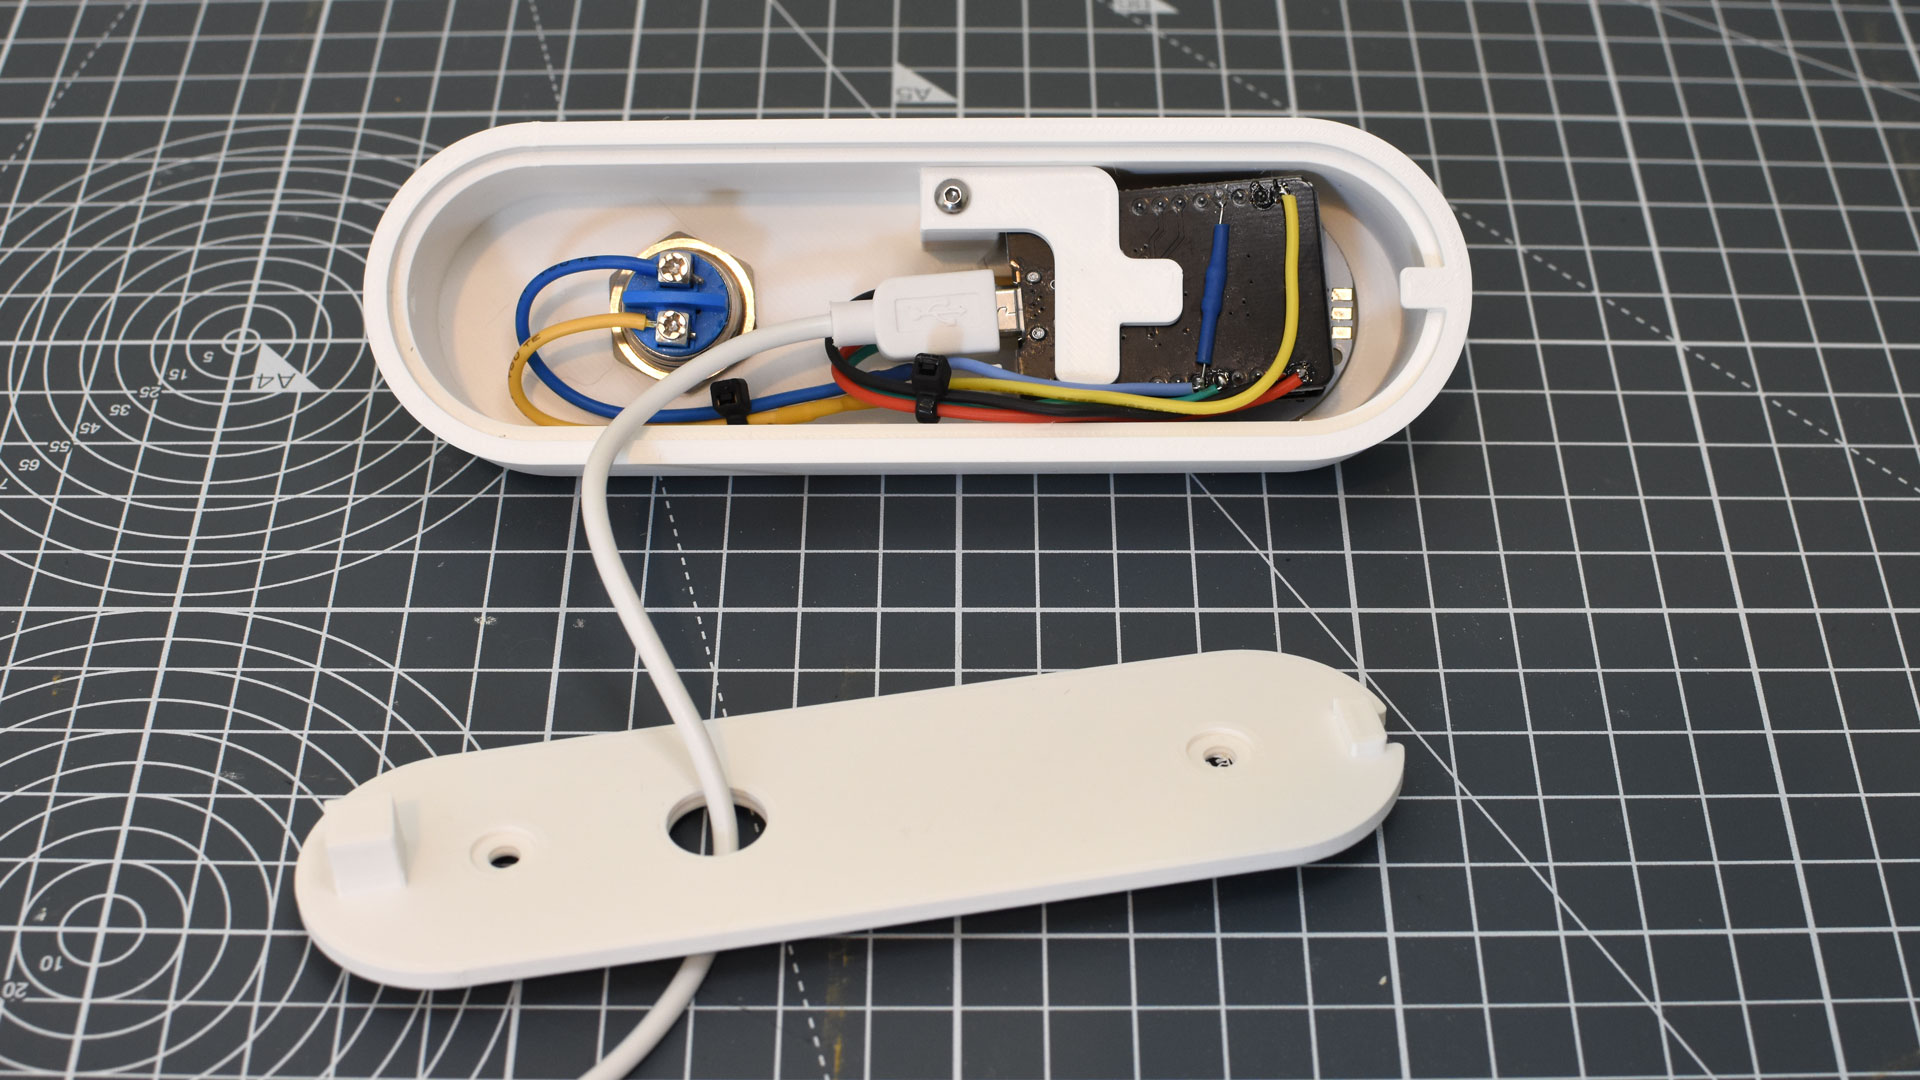
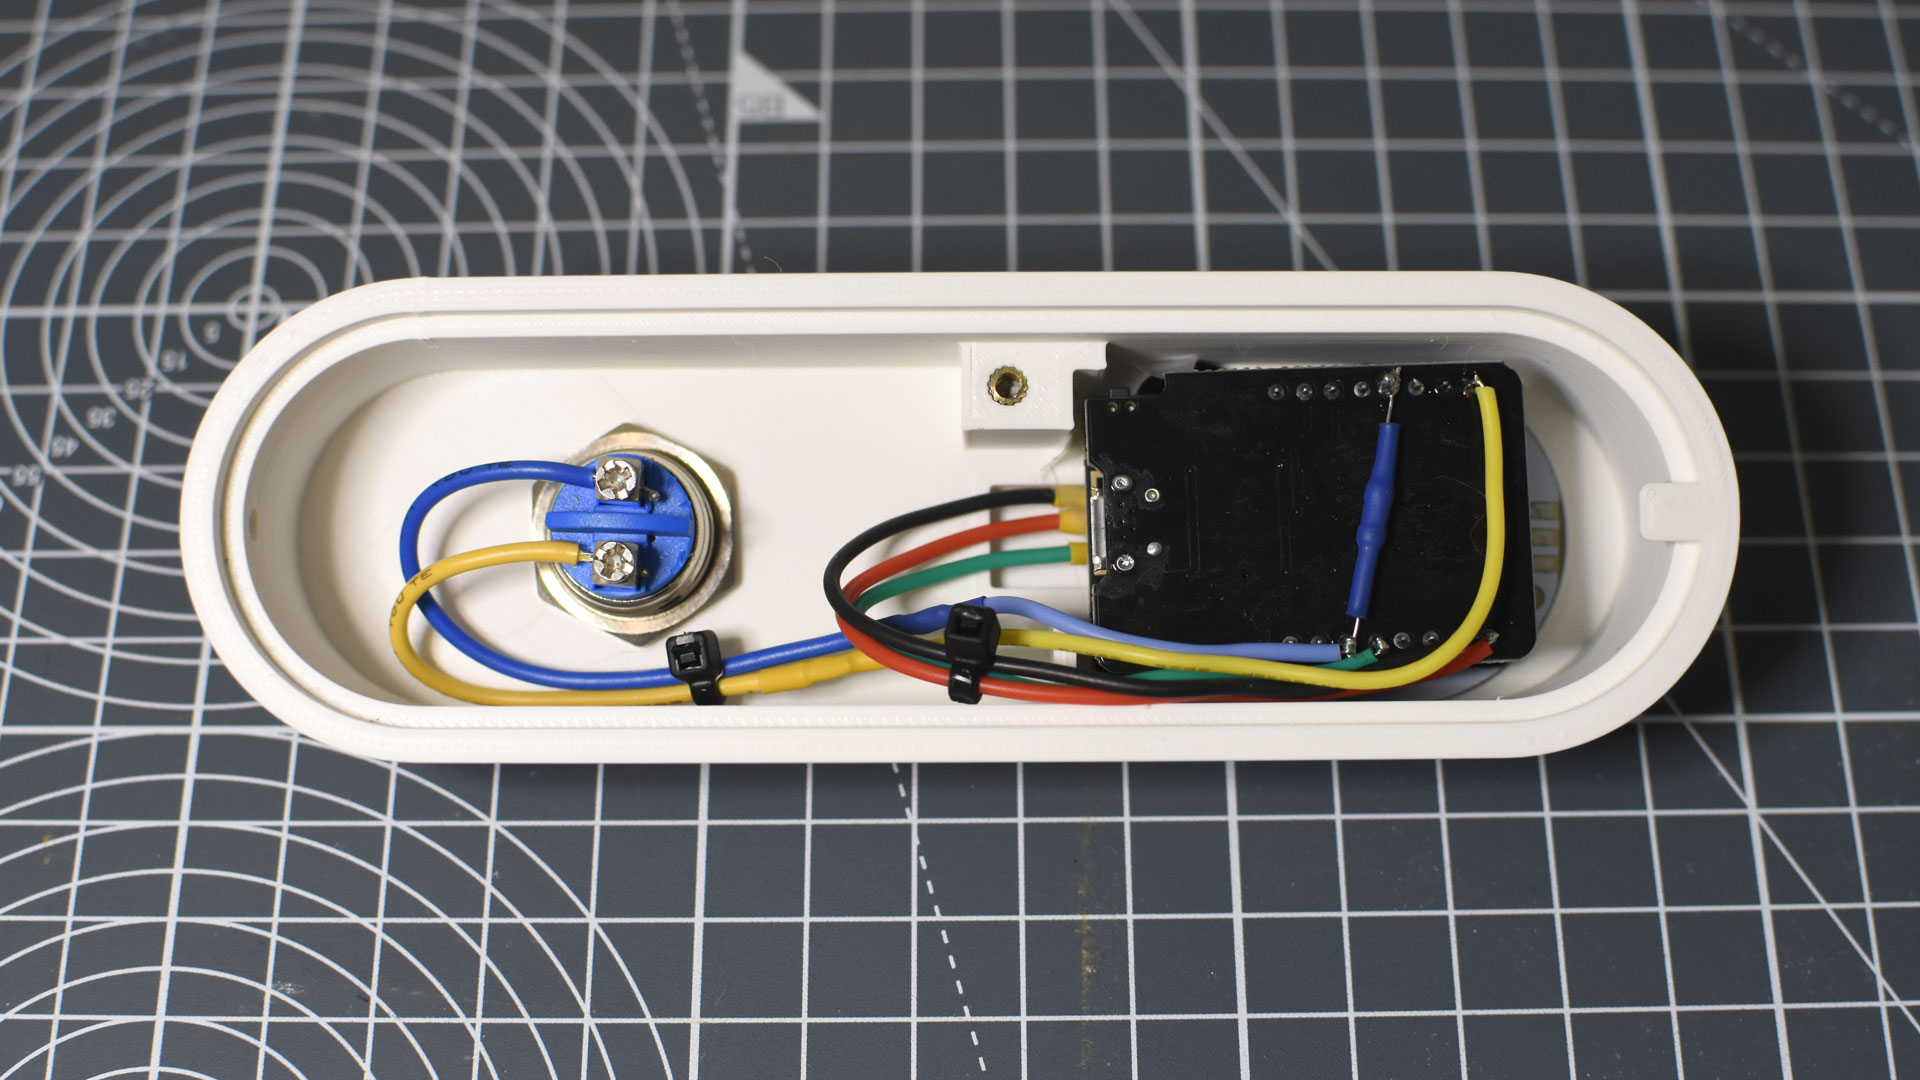
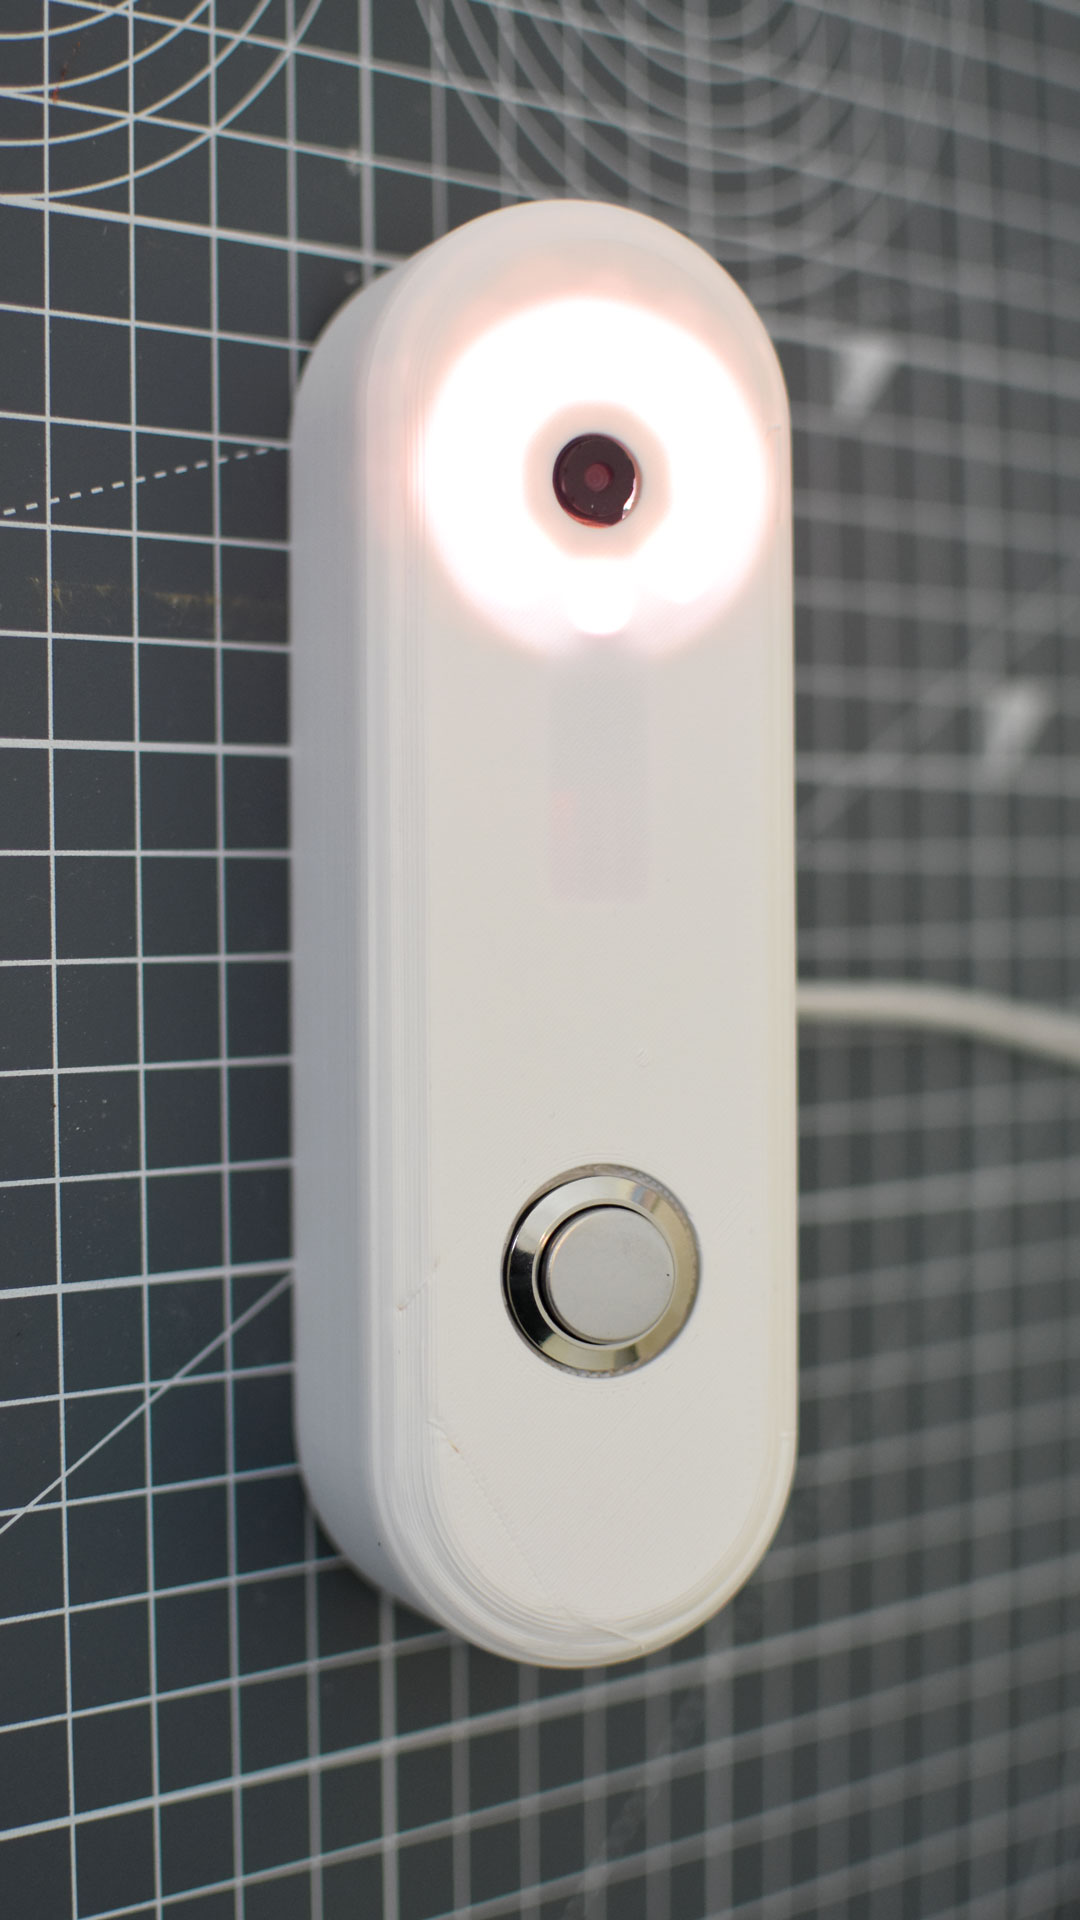
Step 4 – Time to wire it up
Once the enclosure is printed, we can start the final assembly.
There are a few variants of the ESP32-CAM board, each with slightly different pinouts so double check the pinout on the board you get.
Follow the wiring guide below. I soldered everything onto the back of the lower PCB (the one with the micro USB port). It’s important to add the 10k ohm pull down resistor between GPIO14 and ground because without it, I noticed GPIO14 was floating high on quite often.
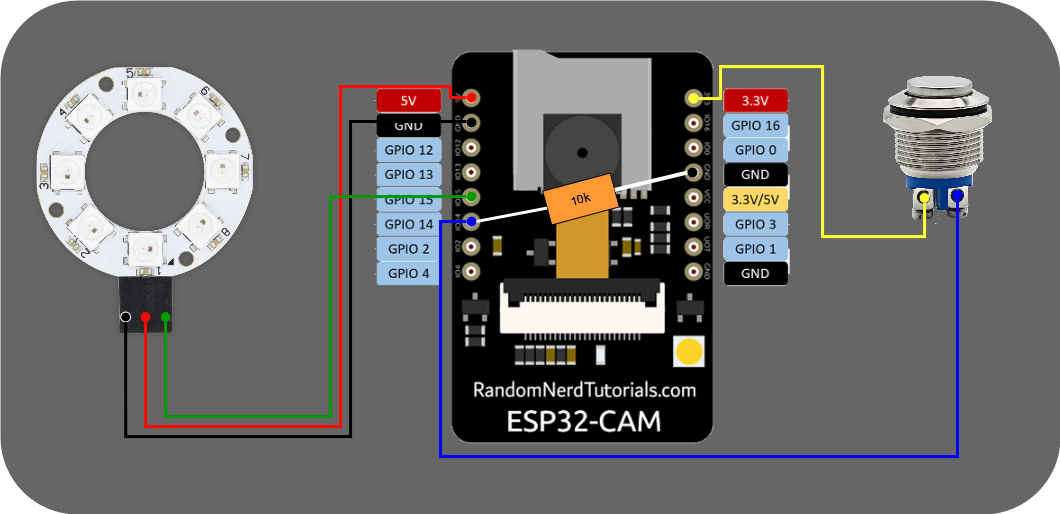
This is what it should look like when you’re done. Bonus points for covering the resistor in heatshrink tube.
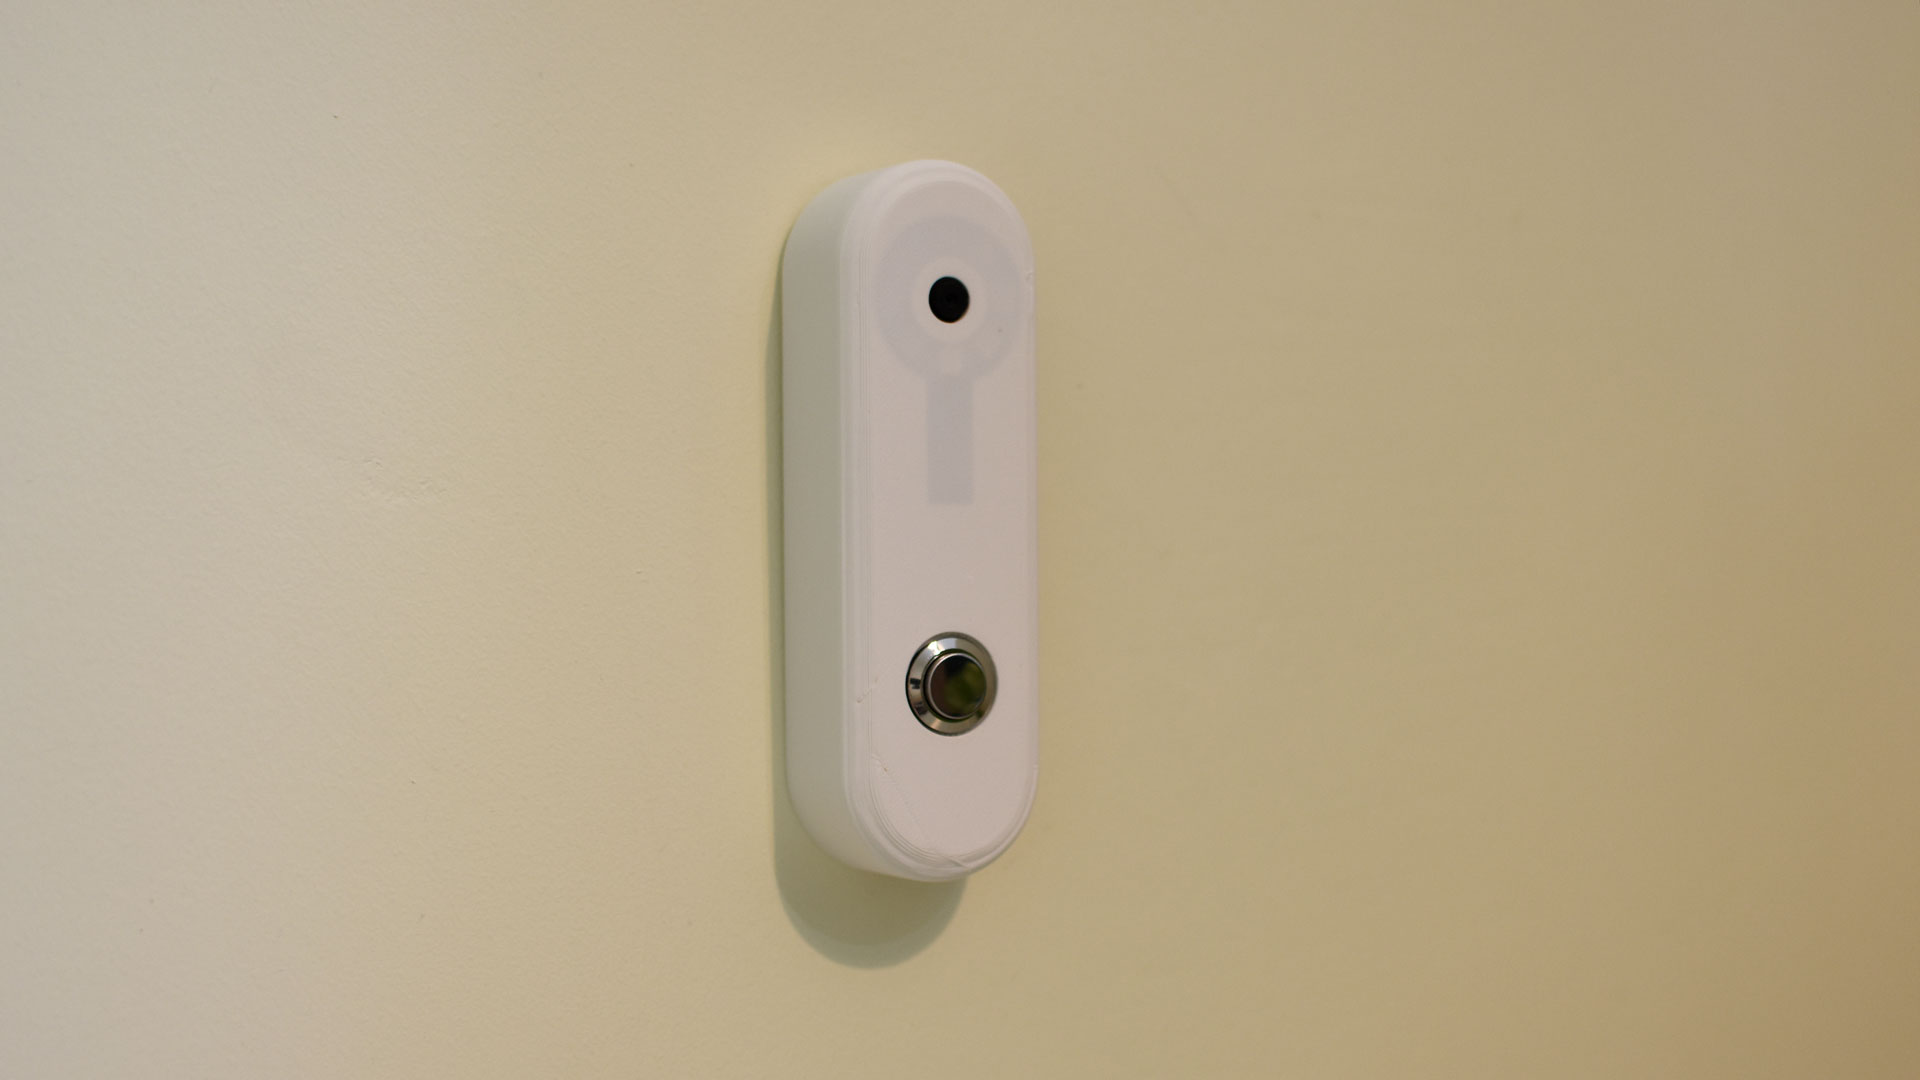
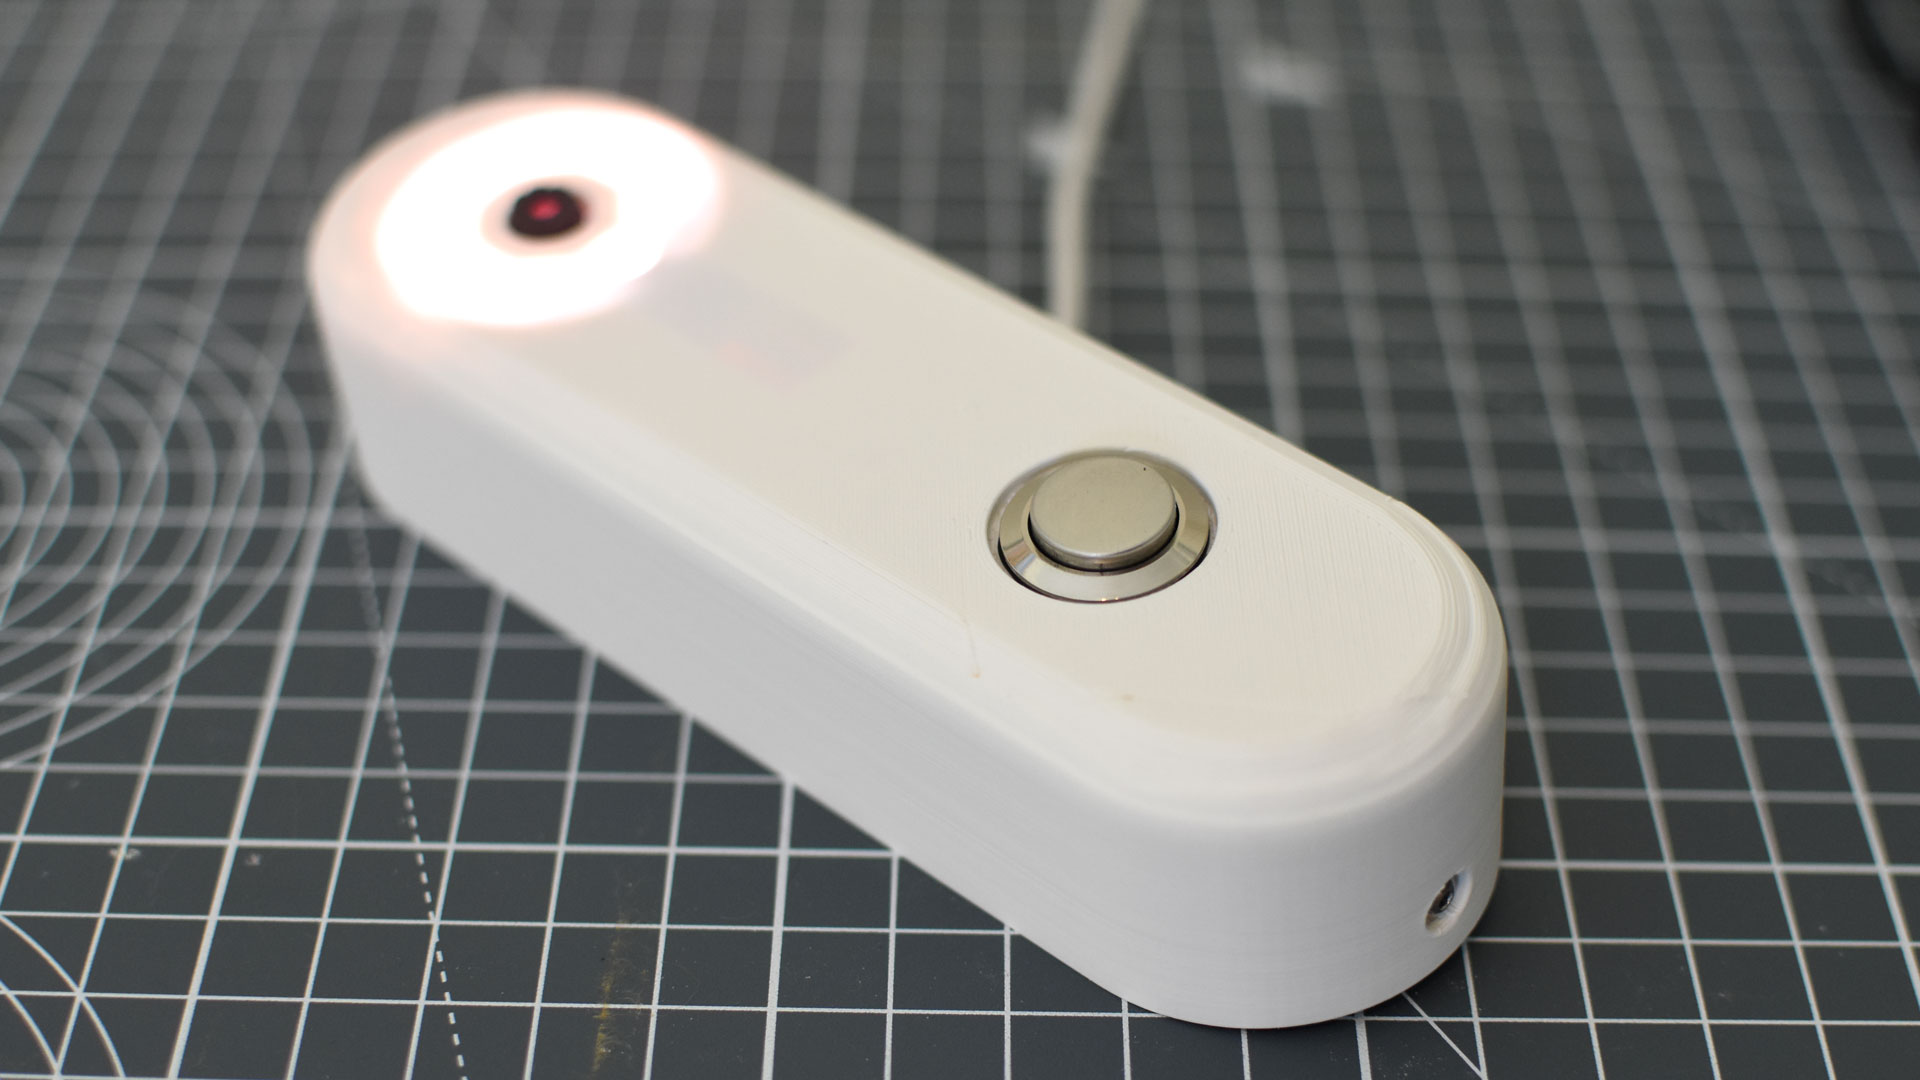
Here are some pics of mine before it goes up next to the front door!
*The product links in this post may contain affiliate links. I donate 20% of these earnings to the Good Work Foundation to help innovate learning in South Africa’s rural communities.
Thanks for making it to the end of the post!


Sounds cool. Is there any facility to have the door bell button ring a classic bell rather than needing a home assistant computer to be up to hear the door bell?
If you somehow (maybe with a relay or something) hooked up the bell to either that esp or another esphome device, you could set it up as a gpio switch and have an automation to turn it on for a couple seconds, or while the button is pressed
As Jakub mentioned below, you could hook up a relay to one of the GPIO pins on the ESP32 which could sound a bell.
Maybe combine stuff with https://frenck.dev/diy-smart-doorbell-for-just-2-dollar/
I made one similar to this a set up an automation through home assistant to play a bell chime through my Sonos speaker so it could be heard through the house
The problem I found with esp32 was the low quality video is hard to compete with a 2k door camera, and it suffered from high latency
The write-up doesn’t talk much about final installation of the doorbell. How did you supply power to it? Does it run on existing doorbell wiring?
Yeah, I wasn’t keen to have my house on the internet. I’ve run a 10m USB cable to the doorbell and powered it from a normal phone charger. I’m going to work on an option that accepts 24v AC which is what most doorbells run on so keep an eye out for that.
Try this: https://a.co/d/dz4FZAe
That adapter is for a DC input. But AC is what’s needed.
Guy S – the parts list did mention a 10m USB cable, I suppose that’s the power, although the article didn’t mention it. Ah, one of the images has the white USB cable shown. I was wondering about how to waterproof the camera hole – as water coming in there would quickly ruin everything. I am creating several ESPHome devices with I2S speakers, so I could make them do a “ding dong” sound when someone presses the button.
Hey Steve, as you said, the camera hole means that it isn’t waterproof so it would need to be installed somewhere that is protected from rain.
Is it possible to use the ESP32-C6 and a separate camera module? It’s WiFi 6 and radio options could allow for faster connection and lower power consumption. Failing that something like the Seed ESP32-S3 is a much newer variant with brilliant deep sleep power draw
I would love to see a MK2 version with electric lock control 🙂
That sounds like an fun challenge!
Hey man awesome writeup and awesome project thanks for this.
Im just stuck on one thing, the deviceid in the automation.
I cant find the device ID to use and also cant use a entity name as that doesnt seem to work.
Any ideas?
Thanks
Hey Dean!
I used the automation builder to create that automation so it must have populated automatically.
One way to get it is to go to Settings -> Devices & Services -> Devices tab -> Click on the device (the doorbell in this case) and the device ID is the last part of the URL (from /device/ onwards).
Good luck!
Hi Tristam.
Brilliant simple solution.
I have a space ESP32-CAM. Can you let me know what software/firmware you used in the ESP32-CAM?
Many thanks,
Hey Alan
I use ESPHome (https://esphome.io/ ) firmware on the ESP32 which sends data back to Home Assistant.
Cheers
have you tryed some of this for pull-up problem?
https://news.ycombinator.com/item?id=37133353
I’ve received a ton of messages about the need for the pull down resistor. According to this github post (https://github.com/raphaelbs/esp32-cam-ai-thinker/blob/master/docs/esp32cam-pin-notes.md ), the ai-thinker version doesn’t have many pull-up or pull-down resistors.
I tried using the “INPUT_PULLDOWN” as shown in that thread but it didn’t work.
do you think so could be run on a battery?
Hey Chad, it could run on a battery but you’d want to put the ESP into deep sleep until someone presses the button and you wouldn’t want to live stream from the camera.
Thanks for this amazing guide. Can you please share (on Printables) the source model for the enclosure? I’m thinking about using the present doorbell button and adding just the esp cam into separate box, and I love your design.
copied homeassistant_automation.yaml to end of file, but get many many errors… alias not found…trigger not found and so on.
What is this caused by.
Ignore this comment, it’s sorted now 🙂
Sorry, but I still get all the errors… where does the homeassistant_automation.yaml actually go…..
where does the esphome.yaml config go there is already code in there.
READ THE INSTRUCTIONS…. it’s all there.
Hi,
I’ve added the configurations to the doorbell.yaml and the automations.yaml but nothing happens when i push the button.
I’ve checked the switch, I’ve tested the notify mobile app…. in the developer tools/services section and that works, I can switch the light on from the dashboard – but it won’t switch off. I’ve added my device id etc etc… I don’t know what else to do.
hello,
I tried it a few times and no matter how I do it (macOS app or Chrome) it shows:
preparation failed:
INFO ESPHome 2023.10.6
INFO Reading configuration /config/esphome/dingdong.yaml…
ERROR Error while reading config: Invalid YAML syntax:
while parsing a block mapping
in “/config/esphome/dingdong.yaml”, line 1, column 1:
esphome:
^
expected , but found ”
in “/config/esphome/dingdong.yaml”, line 32, column 3:
port: 80
^
any suggestions?
I am a noob in electronics , the 10k resistor what wattage ?
Tiny tiny tiny amount of power for that resistor, so anything you have will be plenty.
im having troubble setting up the images in the automation, what exactly do i have to replace the address with? with the home assistant address or the address of the camera? i tried both already but they both dont work
Awesome project. I love it. I was just thinking though rolling one of my own after trying to find a good hackable commercial product. But you called it in your first sentence — there don’t seem to be any out there aside from one other ESP32 idea I saw. Nice work and thanks for taking the time to publish it!
newer to ESP home, have been using Tasmota for most things
just curious why the onboard LED blinks on startup / until it makes a connection to the home assistant server or when it loses connection
pin: GPIO4
name: “Doorbell Onboard LED”
Love the privacy focus! I love the fact I can effortlessly manage the device using a Home Assistant local control function. Cause who would not want that a house which is both secure and connected would be considered a wise decision.
Thanks a lot for providing this interesting stuff.
I successfully connected this esphome device to HA, but the image is symmetrical, how to set the image to mirror?
self-questioning
need add –
horizontal_mirror: false