Automatically shutting down Octoprint from Home Assistant
In my quest to automate everything, I’ve built this automation in Home Assistant that shuts down Octoprint and then turns off a Sonoff that powers my Creality Ender 3 v2 Neo 30 minutes after a print completes.
Prerequisites
- Home Assistant running running locally ✅
- Your 3D printer is connected to a smart switch that is controllable from Home Assistant (I used a Sonoff Basic running ESPHome for this tutorial) You can grab one on Amazon (US, DE) ✅
- Octoprint (either Octopi or octoprint – this tutorial will focus on Octopi but it shouldn’t matter) ✅
- Octoprint is communicating with Home Assistant via the Home Assistant integration ✅
Part 1 – Setting up SSH keys 🔑
Digital Ocean has this great guide for creating a pair of SSH keys. Which I have summarised into the commands below. Using SSH keys will allow Home Assistant to connect to Octoprint to execute the shutdown command without needing to enter any passwords. P.S. Yes I know this can be done using MQTT or the REST API but I want to use SSH.
1. Generate the SSH key for your Home Assistant machine (I used the Terminal & SSH add-on).
$ ssh-keygen2. Push the public key from Home Assistant to your Octoprint server:
$ ssh-copy-id pi@<octoprint_server>3. You should now be able to SSH from Home Assistant to your Octoprint server without needing to enter a password. You can test this by running the following command in the Terminal & SSH add-on in HA.
$ ssh pi@<octoprint_server>4. I found that HA couldn’t get to the default /root/.ssh directory you’ll want to copy the id_rsa file to the HA config directory. Once again, using the Terminal & SSH add-on in HA to execute this command.
$ cp /root/.ssh/id_rsa /configPart 2 – Permission to shutdown 👌🏻
1. We need to update the permissions for the shutdown script on the Pi so it can be run without sudo (and a password) so you’ll need to login to the Octoprint server via SSH and run the following command:
$ sudo chmod 4755 /sbin/poweroff2. To test that this is working correctly, you can logout of the Octoprint server and login to Home Assistant (using SSH/the terminal add-on) to execute the following command. This will connect to Octoprint via SSH and send it the shutdown command. If all goes well, this will shut down the Octoprint server so you’ll need to restart it.
$ ssh -i /config/id_rsa -o 'StrictHostKeyChecking=no' pi@<octoprint_server> '/sbin/poweroff'Part 3 – Automation 🤖
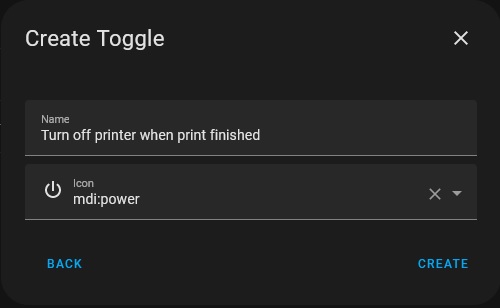
Before we can wrap this up in an automation, you might want to create a helper in Home Assistant that lets you enable/disable the automatic shutdown. I did this by going to Settings -> Devices & Services -> Helpers -> Create to create a toggle switch with the following name.

We’re almost there! Now it’s time create an automation that waits for the print_job_percentage to be at 100% for 30 minutes before sending the poweroff command to the pi, waiting another five minutes and then turning off the smart switch to power off the printer. Here is my automation yaml for Home Assistant. You’ll likely need to update the entity_id’s before you can import it by going to Setting -> Automatons -> Create in Home Assistant.
alias: 3D printer | turn off after 30 mins
description: ""
trigger:
  - platform: numeric_state
    entity_id: sensor.octoprint_job_percentage
    above: 99.9
    for:
      hours: 0
      minutes: 30
      seconds: 0
condition:
  - condition: state
    entity_id: input_boolean.turn_off_printer_when_print_finished
    state: "on"
action:
  - service: notify.mobile_app_sm_g990e
    data:
      message: The printer will shut down soon.
  - service: shell_command.ssh_shutdown_octoprint
    data: {}
  - delay:
      hours: 0
      minutes: 5
      seconds: 0
      milliseconds: 0
  - type: turn_off
    device_id: 35a39d272b7c3138a23222a95672a1e3
    entity_id: switch.3d_printer_sonoff
    domain: switch
mode: single
And that’s a wrap! 🎉
If everything went to plan, you should have two toggles in home assistant and the new automation.

*The product links in this post may contain affiliate links. I donate 20% of these earnings to the Good Work Foundation to help innovate learning in South Africa’s rural communities.
Thanks for making it to the end of the post!


Isn’t the part missing where you actually add the shell_command to your configuration.yaml?